Pages

Showing posts with label Park Lane DSP. Show all posts

Crafty Fun Day

So all the clearing up is now done, but I'm pleased to say that everyone had fun yesterday and I think that everyone liked all the projects that they made.


Thank you Carol for giving up your day and helping out. I know you love these crafty days, and your help is very much appreciated.

As promised, here's a few photos of one of the projects that everyone made. 


If you are wondering what it is - it's a card with a detachable bookmark. This was one of my favourites from the day.

The card features a number of techniques.

The front greeting was paper pierced using the Occasions Paper Piercing Pack. The small flower in the bottom left photo was coloured using Blender Pens and the stamping on the bookmark itself involved colouring in the stamp using Stampin' Write Markers and a bit more paper piercing.

In all, everyone made 10 cards and a box to hold them all. Most of the projects were made using the Hello Darling stamp set, and a couple featured the Lovely Lace Embossing Folder.

Here's details of what was used to make the bookmark card.


Forgot the Envelopes

Being from the UK I naturally make my cards a standard A6 size (A4 cut in half and then folded).  I realised this morning that I did not bring any envelopes with me and the card that I shared on Thursday (to be given this evening) won't fit a US standard envelope. After my doh moment of realisation, I remember that I have my Envelope Punch Board with me and also some 12" x 12" Designer Series Paper (DSP). This meant that all was not lost.

With said trusty Envelope Punch Board and Blackberry Bliss DSP in hand I proceeded to make the necessary envelope. I also decorated it to match the notebook that I had covered as a small gift.


I know that I need to work out a way to make sure that the dots on the DSP go straight across the envelope, but the friend I am giving this to is kind of quirky (sorry Mary) and hopefully won't mind too much.


This is a closer look at the decorations on the notebook. The Blackberry Bliss is stamped straight onto the Lost Lagoon but the Hello Honey centre was stamped and then cut out using the matching die from the Flower Flair Framelits. Everything is glued flat and there are no dimensionals involved because I do not want any of the layers catching on anything and being pulled off as a result.

A complete list of everything I used is as follows:


Here's hoping that Mary likes her gift, and I'm off now to make a couple more (one for me for a change).

Flower Patch card

What is it about flowers?

I've been looking through the Annual Catalogue  and I have to admit that my wish list seems to be leaning heavily towards most of the new stamp sets that have flowers in them. I know I need to see some inspiration before I fall in love with some of the other sets, but honestly I do need to widen my horizons.

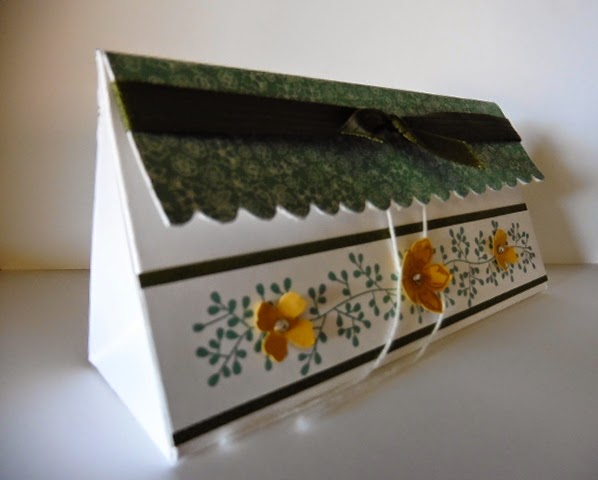
Staying on the flower theme, today's card was made using the Flower Patch Bundle (Flower Patch Stamp Set and Flower Flair Framelit Dies). Don't forget that by purchasing the bundle you save 15%.

It's taken me a little while to get my hands on this set as it has proved to be very popular. Now that I have it, you can expect to see a few more cards and things over the coming week or two.


I'm really taken with the Blackberry Bliss ink but not so much with what it does to my stamps. The Flower Patch stamp set is a Photopolymer set which means it is clear. This is great for two set stamping such as the leaves that I've stamped in Pear Pizzazz and Mossy Meadow. The Blackberry Bliss does however have a habit of staining the stamps as you can see from the next picture.


Please be assured that the staining does not affect the stamp's ability to give a clear stamped image it's just that the stamp itself is no longer as pretty as a clear one. I just wanted to warn you that this will happen should you use this colour (Real Red is another colour that does this), but it's such a lovely colour that it can be forgiven for what it does to the stamps.

Stampin' Up! supplies used to make this card are:


Just in case you are wondering, I stamped the flower image three times. The bottom layer is the full flower, for the second layer I cut off the outer layer of petals and then layered the smaller flower directly over the bottom image and the top layer is just the middle part cut out. I rotated it a little to cover up a blemish on the middle image (we can't all be perfect and it's a handmade card so it's not going to be).

Back again...

It seems ages since I posted but it's only been a week. Things have been busy over the last week - I spent three days in Chicago with my son, Michael. We had to go there because he had to attend orientation at the university he will be going to come September. Orientation was a two day experience (compulsory for the kids) and parents also get to visit and find out more about the university too (not compulsory for parents). It was an interesting experience, so different from the one I attended with Jenny last year.

I'm now in San Diego and things are slowly getting back to "normal", not that there's much normal in our household.

Since arriving in San Diego,  I have managed to finish a couple of samples for the tutorial that should post this evening.


The tutorial is based on the box above but I also made another version with a sheet of Designer Series Paper. They are identical boxes made using the same dimensions, just different materials. The box above was made using Whisper White card stock and then decorated. The box below has less by way of decoration because I used Designer Series Paper.


From the side

I also used a different way of closing the box - the flap is caught under a paper "bar" that I've glued to the front. I also used co-ordinating card stock to add a border around the flap to give a little contrast.
  
From the front

These boxes are really quite simple to make and once you have finished one you will be hooked. You could of course add a handle to the box and make it into a purse. Just a suggestion. 

I hope you give the tutorial a try and I would love to see what you make. Photo's can be posted on the Oakfield Crafts facebook page.

Stampin' Up! supplies used for this project are: