Pages

Making labels from Framelits

I have been having fun with the new Framelit Dies that are in the Summer Mini Catalogue.

On Friday evening I had eight ladies over for a class where we used the Framelits along with some of the other new product from the Summer Mini Catalogue.

As well as three cards, I had planned that we make a small treat holder - I had seen one on Monica Gale's blog but changed it somewhat by using a different stamp set, paper etc.  Because we had so much fun making the cards we ran out of time to do the Treat Holder. Each of the ladies will be receiving a pack containing pre-cut card stock, paper and some printed instructions so that they can still make the project at home.


For my version I used the largest Framelit die and cut two of these out in Baja Breeze. The Island Indigo card stock was also cut using the same die (by putting the card stock accross the die from point to point) and then embossed using the heart folder from the Adorning Accents Embossing Folder set.

The holder was stamped in Baja Breeze using the Tiny Tags stamp set.

I wanted to sit the greeting label on another label so decided to make one out of the framelits die. This is a fairly simple process as you will see from the following photos.

Cut out label using chosen Framelit Die and the Big Shot
 - you do not have to use such a large piece of DSP.
I already had this piece so used it rather than cut some more.

Once first cut is made, move the Framelit Die so that
it produces the shape that you want and run it
through the Big Shot again

Finished label


I chose to finish off the Treat Holder by putting a small box inside to hold the gift (in case this some Chocolate Eclair sweets). This was made using the Simply Scored Scoring tool by cutting a piece of card 2 inches wider and longer than the box size wanted and then scoring on all sides at the 1 inch mark. The Simply Scored Scoring Tool makes quick work of making boxes and all sorts of other things, and it is now part of my must have Basic Tool Kit.

If you are interested in attending one of my Classes please check out my Events and Classes page for more information.

Twitterpated Fabric flower card

When I first saw the Twitterpated Fabric, I fell in love with it. Despite not being a seamstress I have quite a few ideas as to what I want to do with them.

The Twitterpated Fabric has three different designs and you will receive a piece of each which are 27" x 18" in size. The fabric is 100% cotton.


Here is a card that I have made using the Mixed Bunch stamp set, the Fun Flowers die and also some of the lovely co-ordinating Pleated Satin Ribbon in Blushing Bride.


Before running the Twitterpated Fabric through the Big Shot I stuck a piece of it onto a Big Shot Multipurpose Adhesive Sheet. On the reverse side I stuck some Blushing Bride card stock. I then ran the whole thing through the Big Shot using the Fun Flowers die. I also ran some felt through the Big Shot using the same die so that when I layered the two there was some added dimension. The flower has been held together with a Real Red brad from the Brights Collection.

The Riding Hood Red base card has a flower from the Mixed Bunch stamped on it - also in Riding Hood Red.

The greeting comes from the You're Cherished set. This is a set of two stamps that quite often gets missed on the Simply Sent page in the Main Catalogue and using it at Regional Training made me remember about it so dug out my set.

Have you figured out how I attached the flower to the card yet? The Pleated Satin Ribbon hides the strip of acetate that fixes the flower to the card.


Training in Reading - Part II

Well I'm now back in sunny England (no I'm not being sarcastic - it has been lovely here today). I'm still trying to get over the jet-lag so todays' post is a bit of a cheat as it is the second part of the photos of the samples that I saw at training the other week.   I have tried to keep them in some sort of order! 

The first few use The Open Sea stamp set along with the Baker's Twine, which is on a couple of the cards.


The next set of photos features the Tea Shoppe set of stamps along with some of the Twitterpated DSP and the lovely Pleated Satin Ribbon.


The last set feature the Love & Laughter stamp set, the Baby Prints stamp set and also the Up, Up and Away stamp set.

Pleated Satin Ribbon too


I've still to take photos of the swaps I received and I will post these along with photos of the project's I've made with the appropriate stamp set, punch, or dies.

Mellow Yellow

A couple of weeks ago I spent a lovely afternoon with two crafty friends Cate (my Stampin' Up Mum) and Diane (aka Crafty Ducks and Stampin' sister). Both Diane and I went to Regional Training the previous weekend in Reading but Cate did not. We told her all about our lovely day and also cased a card that we had made on the day.  I don't think it's a secret that we all received the Mixed Bunch stamp set at Training, it was after all announced on the web-site.

Here is the card the three of us made during our crafty afternoon - we did actually change quite a bit and also used the Rock and Roll method to stamp the card. This technique gives a lovely effect and it is one that I will be using in my now full Summer Mini Card Class on 25 May.

I was going to enter this into a challenge but then thought better of it. Not because I don't like the card but because I did not want to spoil the surprise of the Make & Takes for those whose regional training is a few weeks after the one that I went to. The last one was today so I think I am safe in posting this now.


The base card is Daffodil Delight and the ink colours we used were Daffodil Yellow, Pear Pizzazz and Pumpkin Pie. As well as the Mixed Bunch stamp set we also used the matching Blossom punch for the flower and the Dotted Scallop Ribbon punch. 

Bordering on Romance - Watercolor Crayons Part II

In the previous watercolor crayon post I mentioned that if you don't have any Watercolor Paper that it is best to use a Blender Pen because the normal card stock is not able to absorb water too well.

Today's cards feature stamped images from the Bordering on Romance stamp set that have been coloured using my Brights Collection of Watercolor Wonder Crayons and a Blender Pen.

The set of three cards

Score lines were added using the Simply Scored Scoring Tool

Score lines were added using the Simply Scored Scoring Board
with the Diagonal Plate

Stamped background using another of the stamps from
the Bordering on Romance stamp set
As you can see from the cards, the Simply Scored Scoring Tool is great for adding background details to your cards. It is so quick and simple to use - both of those backgrounds were done in a matter of seconds.

If you would like to get your hands on a Simply Scored Scoring Tool (Item no. 122334) please drop me a line. They cost £25.95 and you can also purchase the Metric Scoring Plate (Item no. 127531) and the Diagonal Plate (Item no. 125586) for £10.95 each. It is also possible to purchase additional sets of 6 Simply Scored Place Markers (the tool comes with 3) for £2.25 and additional Simply Scored Stylus's for £3.95 each. Between now and 31 August 2012, if you purchase through me, the the Simply Scored Scoring Tool AND either the Metric or Diagonal Plate, I will send you a free set of 6 Simply Scored Place Markers. Please note that this is an offer exclusive to me.

Not a card but just as pretty

Some of you may already know, but I lived in San Diego for some 6 years. My husband's work takes him back there on a regular basis and last year he spent nearly six months there in total. We are lucky because we have a house in La Jolla (which is where I am now), so when he decided that he had to come over again it was a case of if you can't beat them, join them.

A view of downtown San Diego from our balcony


I don't have much Stampin' Up! stash over here. Although SU is an American company I should only buy product through SU UK. It is tempting to stock up while over here but I have resisted the urge on the basis that I'm not here that often and I can still get my own demonstrator discount back in the UK. Did you know that demonstrators receive a 20% discount on items in the Catalogues and if you join and spend more than £150 on your first order within 45 days of joining you receive a 30% discount? Click on this link for more information - Join My team.

Today's post contains photos of some of my favourite plants here in San Diego - taken around the neighbourhood. They are that I used to have in my old garden over here (this house doesn't have a garden as such). I was hoping to manage to get a photo of the hummingbird that visits our pine tree but no such luck just a picture of where the hummingbird has been!

Please note I am not a gardener - I love plants and know what I like, I'm just no good at remembering names nor am I keen enough to go look up the latin/botanical names for things. So, apologies if I have the names wrong.


Honest - there was a Hummingbird!

Bottlebrush Tree

Iris of some sort but can't remember it's name

Bougainvillia - gorgeous flower but horrid long thorns

Very pretty but part of the onion/garlic family so it stinks if you crush it

Bird of Paradise - or Strelitzia (remembered that one!)

Agapanthus

Cactus of some sort - the long bit is it's flower!
There are tons more flowers that I remember fondly from living here - jasmine, calla lilies and canna lilies (not to be confused but they are different plants). I've just not been able to find any in the neighbourhood to photograph. Anyway, I hope you have enjoyed a quick look around here.

Bordering 0n Romance - Watercolor Technique

As promised, I have finally managed to get my act together and spend some time crafting while here in the USA. I try to travel light so I was not able to bring the whole contents of my craft room (I would need a 20ft container if I wanted to bring everything with me) but I am starting to hoard my own little stash of goodies here. For those of you wondering where I am, I am currently in La Jolla which is right on the coast in Southern California, not far from San Diego.

This month's technique is supposed to be Watercolour but it has been taken over by the Summer Mini Catalogue. I have however managed to combine the two in today's project.

I have brought with me a set of Brights Watercolor Wonder Crayons along with the Bordering on Romance stamp set (from the Summer Mini Catalogue), some Whisper White card stock and a pack of Brights card stock. 

The Watercolor Wonder Crayons come in tins so they are easy to keep and they come in each of the four family colourway collections, including Neutrals. Each tin contains 10 crayons. Also. as the name implies, the crayons are water soluble so you can water colour with them. You can of course also use them like normal colouring crayons and I have on odd occasions found my daughter helping herself to them for a school project!

Please note that the Watercolor Crayons can be used on normal card stock, which is what I have done on these projects (I forgot to bring the Watercolor Paper with me) but images should always be stamped using a waterproof ink so that it does not bleed. Also, if you do use card stock rather than Watercolor Paper, because the card stock does not absorb water very well it is better to use a Blender Pen rather than a wet brush.

So, here are a few ways to use the crayons.
  • The first is to simply colour in part of the image and then blend in the crayon using an Aqua Painter, a small wet paint brush or a Blender Pen. This is a very good way of blending the colours together. Or,
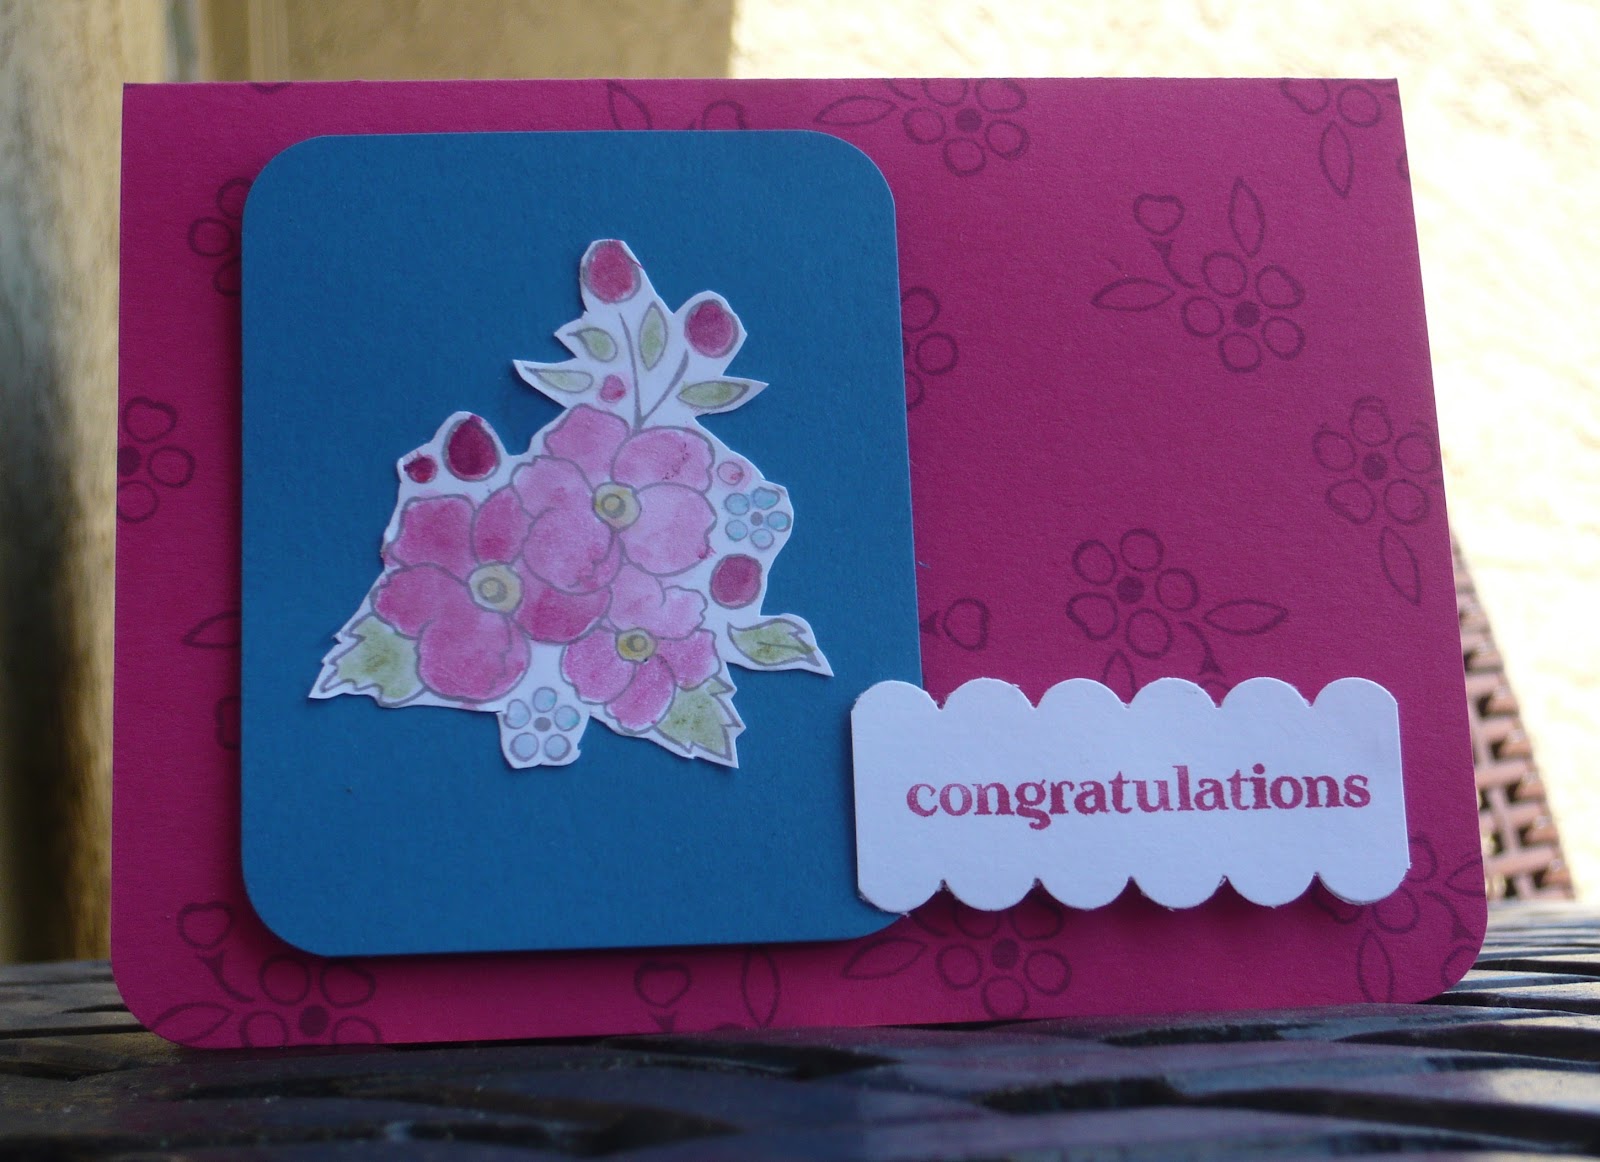
  • The second (and the method I used for these images) is to pick up a little of the colour on the wet brush and then apply it to the paper. If the colour is not dark enough, then pick up some more colour from the crayon and paint over again. Or,
  • You can colour directly onto your stamp and then mist with water and then stamp the image. This works best with solid images and I will be showing you projects made using this method in the next few days or so.
  • You can stamp a solid image using a Versamark inkpad and then clear emboss it. Once cooled you can then colour in the background using a variety of crayons and then mist the paper allowing the colours to blend. This is a technique that I have not tried but I have heard that it works best on Glossy paper, I guess I will have to give it a go and who knows, I may another project to share with you next week using this method.


Here I applied more colour to the centre of the flower

Here I applied more colour to just one flower.


A piece of Whisper White was matted onto the Melon Mambo base card after the border from the Bordering on Romance stamp set was stamped in Melon Mambo (I used my Stampin' Write Markers as I did not want to bring open ink pads with me). The greeting comes from the Delightful Dozen stamp set.


Here, the water coloured image was stuck onto a piece of Pacific Point card stock before being put onto a  Melon Mambo card base. As in the previous card, the greeting comes from the Delightful Dozen stamp set.

Check back later this week to see what other projects I have come up with using the Watercolor Wonder Crayons. Also, if you are interested in purchasing any of the four collections please contact me.

Mixed Bunch Table Decoration

My Big Shot and right arm had a proper work last week. I spent Wednesday afternoon at my mother's where I hold a monthly craft class for her and her friends and this month they made great use of my Petal Cone die to make gift boxes. They made some lovely ones, but while I was standing there cranking the handle on the Big Shot for the umpteenth time a thought crossed my mind.  

I know that this is not an original idea - there have been others that I have seen on the internet and there was even one at Regional Training but below is my version.

I used the Pear Pizzazz card stock as the base for the vase together with some Riding Hood Red card stock and Twitterpated Designer Series Paper.  The top was finished off with some Riding Hood Red Pleated Satin Ribbon (courtesy of Diane as I am going to swap a metre of my Baja Breeze ribbon for her metre of Riding Hood Red).


The flowers were stamped in Riding Hood Red using the Mixed Bunch stamp set (set of 6 stamps)


They were then punched out using the new Blossom punch. I also punched out some Riding Hood Red and Basic Grey card stock and sandwiched the flowers so that there is a flower each side with either the same colour card stock or basic grey card stock in the middle. In the centre of each flower is a piece of stamped Pear Pizzazz or Blushing Bride. I used wooden skewers for the stems of the flowers and cut them at differing heights so that all the flowers could be seen.

The label on the front of the vase comes from the Apothecary Art stamp set and the smallest image was stamped in Riding Hood Red before being cut out using the Framelits Dies that I featured in my post last week. The banner that the label sits on also comes as part of the Petal Cone die.


Training in Reading - Mixed Bunch, Blossom Punch and Twitterpated DSP

I mentioned last week that I and some 125 other Stampin' Up! demonstrators went to Reading for our Regional Training Day. I will post photos of some of the swaps that I received when I get back to the UK, as I would like to acknowledge who made them. In the meantime here are some of the photos that I took of the various projects that were dotted around the room.

All of the following have been made using either the Mixed Bunch stamp set, the Blossom punch or the Twitterpated Designer Series Paper or a combination of these. You will note that there are a couple of projects that have greetings in German, so I guess that someone from there made these but I don't know who. I have attempted to translate the various greetings so apologies if I have them wrong.


Many Thanks or Thank You so Much

Best Wishes

Congratulations on your Engagement (I think)

I will post some other examples made using other stamp sets in the next day or two. In the meantime I need to get on with making a couple of projects using this month's technique.

Summer Mini Blog Hop Part II

Just a very quick post this morning and there are no photos either. Sorry.

As I was looking at my blog earlier, I realised that I had only included details of Part I of the Blog Hop on my 1 May post.  There were so many people interested in taking part this time round, that it was decided to split us into two groups.

If you are interested in looking at the projects made by the other 20 ladies please click here and it will take you to my Stampin' Up! buddy, Julie Halls (aka The Crafty Bug).  You should then be able to hop around that half of the blog by following the links.

Just in case you get lost, the following is a list of all the lovely ladies who were in Group II.

20. Nuttysgirl (Emily) - http://www.stampinmermaid.blogspot.co.uk/
21 CarolynUK - http://stampaholix.blogspot.co.uk/
22 Allyf - www.serendipitypapercuts.blogspot.com
23 Vronie www.vronstampin.blogspot.com
24 Kim www.kimfeecrafter.blogspot.com
25 Beckie (Littlebeckie) www.bextiesandstickytape.blogspot.com
26 Sally http://girliepink.blogspotcom
27 Christa http://serendipity-stamping.blogspot.co.uk/
28. DonnaM www.head-over-heels-by-dlm.blogspot.com
29 Laura http://airingcupboardstamping.blogspot.co.uk/
30. Emma H http://emma-letsstamp.blogspot.com/
31. Margaret K www.makingpapercrafts.blogspot.com
32. Kate http://stampinupwithkate.blogspot.co.uk/
33. Sarah http://esellek.blogspot.co.uk/
34. Jayne http://jaynescraftycorner.blogspot.co.uk/
35. Clare http://sparklecrafts.blogspot.com
36. Sharon http://stamps-n-inks.blogspot.co.uk/
37. Julie http://www.the-crafty-bug.blogspot.com 
38. Anthea http://stampin-divas.blogspot.co.uk/
39. Vicky http://vickylouscorner.blogspot.com

Also, with all the excitement of the Summer Mini going on, I just wanted to let you know that I haven't forgotten that this month's technique is supposed to be projects using Watercolor Wonder Crayons.

For those of you who don't know what these are, they are water-soluble crayons that you can use with a Blender Pen, or Aqua Painter to color or shade your stamping projects.  I will be posting photos of some of my projects over the coming weeks.

Open House Make & Takes

After much deliberation I decided to prepare two Make & Takes for Saturday's Open House. The ladies who arrived in the morning made one and the ladies who arrived in the afternoon made a different one.

The one that we made in the morning was CASED from a swap I received at Regional Training that had been made by Sue (frankiesue).

This is the Make & Take that the ladies made in the morning. It is a little different from Sue's square card as I have given it a different colour base card and the greeting is much larger and I used a different stamp set for it.


It has a Baja Breeze card base. The piece of Island Indigo has the ship from The Open Sea stamp set on it that was stamped in Island Indigo too. The "manifesto" was stamped twice in Soft Suede onto a piece of Naturals Ivory and then we tore the paper so that the ship image that would have been underneath could be seen. The globe image was stamped in Island Indigo and a couple of More Mustard compasses were added for good measure. The greeting comes from the Curly Cute stamp set and we stamped this in More Mustard before cutting the card so that it looks like a banner.

The Make & Take that the afternoon ladies made used the Mixed Bunch stamp set along with the Blossom Punch.


We used a piece of Crumb Cake as the card base and a piece of Peach Parfait was matted onto this.  Onto a piece of Very Vanilla we stamped the swirl from Everything Eleanor in Pear Pizzazz and then the flower from the Mixed Bunch stamp set was stamped in Peach Parfait. A second flower was stamped onto another piece of Very Vanilla using the Rock and Roll technique and Peach Parfait and Concorde Crush. This second image was punched out using the new Blossom punch. And mounted using Dimensionals. The centre of the flower was stamped in Concorde Crush and we added some Dazzling Diamonds for good measure before punching it out using a 1" circle punch and mounting it on the card with a Dimensional. The greeting that I used came from the Teeny Tiny Wishes stamp set - everyone finished their card with a different greeting from the set as there are 24 to choose from.

Summer Mini Open House

Just a quick post today as it's a little manic around here. Today I am holding my first Open House, the Make & Takes are all cut and prepared, the house is clean and tidy (I'll just shut the doors on the kids bedrooms) and I have turned my kitchen/family room into a Stampin'  Up! paradise.

I went to Costco the other week (l love the place and I'm lucky that there is one within 10 miles of home) and picked up a storage cabinet (for want of a better description) that can be pulled apart and reassembled in slightly different combinations.  I thought it would make a great display when holding Stampin' Up! events.  Here's a photo of my Open House display. I could have made it bigger but it wouldn't have fitted on my coffee table.


I don't want to post photos of the Make & Takes on here today as I would like to keep it as a surprise for those attending. I promise to post photos early next week.

Tomorrow I am flying to the USA for 12 days, but I have set up a number of posts for the next few days until I get over the jet lag and am then able to write some new ones.

Twitterpated Sewing Kits

I just love the new Twitterpated Designer Series Paper. They are even lovelier "in the flesh" than in the picture in the Mini Catalogue or below. I know that I will be making some fabulous projects with them and I will share some of them on here with you.


I have had some sewing kits sitting on my shelf for ages. I originally bought them to use for a craft market stall that I do with my sister.  Seeing the paper gave me an idea so I ran some through my Big Shot using the Scallop Envelope Die and voila here are the finished kits. I have to admit that there was a little more to it than that.


I used the Apothecary Art stamp set (set of 6 stamps) to make the small label


and the smallest of the Framelits Dies (set of 6 dies - the largest being approx 13.3 cm wide) to cut it out.
I stamped one image in Riding Hood Red and cut it out using the die and then the centre of the image was stamped in Island Indigo which I then punched out using my 1" Circle Punch. I adhered the label to the envelope is such a way that it keeps the flap closed. But, you are still able to open and close the envelope.

If you are itching to see get your hands on a pack (or two) of the Twitterpated paper, Apothecary Art stamp set, Framelits Dies or anything else in the Summer Mini Catalogue please contact me. As part of my Open House that I am holding this weekend I am offering FREE P&P on all orders over £45 received between now and 6pm Saturday evening. I will be on holiday from 6 May to 19 May which is why your qualifying order needs to be in by 6 pm for the FREE P&P.

I am scheduling some posts for while I am away so there will be some new ideas popping up on here every couple of days. I also hope to get some crafting done while I am away and I'm hoping that I will also pick up some new ideas too.