Pages

CAS Colours & Sketches - Challenge # 257 The Double

It’s the last (and fifth) Tuesday in January so Bev has a double challenge for us today.

The colours above have been retired for a little while so I don’t have them. Instead, I’ve used what I think are the closest from the current colours available.
It wasn’t until I was making up the graphic that I realised that all the names begin with P!

I’ve opted to change my design a little and make a standard portrait card instead of a square. This fitted in much better with the heart image that I wanted to use.
Valentines, Stampin' Up!, Oakfield Crafts
I used the stamps from the Sure Do Love You stamp set along with some of the dies from the co-ordinating Lots of Love Box Framelits.
Here’s a closer look at the hearts and leaves.

To make the heart 
  • I stamped the border heart in Pool Party onto a scrap piece of Whisper White and then fussy cut it out using a pair of paper snips.
  • Next, I stamped the sentiment in Pear Pizzazz onto a scrap piece of Whisper White and die cut it out. This was then added to the border heart using Stampin’ Dimenensionals.
  • I then die cut a small heart from some scrap Peekaboo Peach cardstock.
  • Next, I  stamped three sets of leaves and die cut them out. They were then glued to the back of the Peekaboo Peach heart.
  • Lastly, I added the heart arrangement to the heart border and finished it off with a cute Pool Party heart from the Subtles Enamel Shapes.
The heart is sitting on a piece of Peekaboo Peach cardstock that was embossed using one of the embossing folders from the Petal Pair Textured Embossing Folders.
I went a little different with the inside this time around and simply stamped a heart in Peekaboo Peach and another sentiment in Archival Black.

To be honest I’m not sure that this card is 100% CAS but it does follow the sketch and the colours, so I’m happy with that.
Don’t forget to check out what everyone else has been up over at the CAS Colours & Sketches Blog and and as always please feel free to leave a comment.
Happy stamping.
Fiona xx

CAS Colours & Sketches - Challenge # 257 The Double

It's the last (and fifth) Tuesday in January so Bev has a double challenge for us today.


The colours above have been retired for a little while so I don't have them. Instead, I've used what I think are the closest from the current colours available.


It wasn't until I was making up the graphic that I realised that all the names begin with P!

Fun at the Sandown Show

Many thanks to everyone who popped over to visit us on the Stampin’ Up! stand this past weekend.  For those of you who are wondering what the heck I’m on about, we had a stand at the recent Crafting Live Show at Sandown Racecourse.

When I first arrived on Friday morning the stand looked like this!  A little bare, as you can see. They supplied the shell and we took everything else with us (inc tables).

It didn’t take us long to put everything up and in a very short while it looked like this.
In case you are wondering who the “us” is, here’s a selfie we took just before the show opened.
Left to Right, Natalie, Kim and myself
If you would like to see more of the projects we had on display you can check them out in this video. I originally took it as a FaceBook Live Video but have managed to upload it to YouTube (warts an all). I’m really going to have to get a handle on my video editing. My son, who is 22 and studying game design at uni says it’s very easy.  I on the other hand am not so sure.

I’m off now to check out a well known internet site for a dummies guide to video editing. I don’t think I’m ever going to win an Oscar though!

Happy stamping.

Fiona xx

Fun at the Sandown Show

Many thanks to everyone who popped over to visit us on the Stampin' Up! stand this past weekend.  For those of you who are wondering what the heck I'm on about, we had a stand at the recent Crafting Live Show at Sandown Racecourse.

When I first arrived on Friday morning the stand looked like this!  A little bare, as you can see. They supplied the shell and we took everything else with us (inc tables).

Stampin' Stars Team Swaps

Last weekend I was involved in two days of training . On Saturday we had the Online Team Training which was done through FaceBook Live and on the Sunday I travelled to the Stampin’ Stars team training over in Crawley.

Today I’m sharing photos and details of some of the swaps I received last Sunday.

swaps, 2018 Sale-A-Bration, 2018 Spring/Summer, Cake Soiree

Here’s all of the swaps I received – all 21 of them. I’ll walk you thorough them a few of a time and I’ve also grouped them per stamp set (to try and keep it simple).

The pictures are in no particular order..

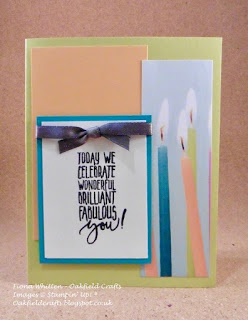
The first group uses the Epic Celebration stamp set – it’s one of the Sale-A-Bration ones.

This stamp set is a great one for the teens. There is a guitar, trainers and image of a pair of headphones too. You can choose this for free with a £45 spend while Sale-A-Bration is on (ends 31 March).

Epic Celebrations
Left – Emmard Goddard, Right – Amanda Skelto
Emma always makes fabulous cards and this year Stampin’ Up! have asked her to be one of the Global Design Team Members for 2018.  The guitar on her card was heat embossed using Silver Embossing Powder and then coloured..
The second card made by Amanda is a simple but very effective one layer card. 
This second group of card features the Magical Day stamp set
This is a cute stamp set with images of a mermaid, knight, unicorn, wizard and dragon. I’m having to hide my stamp set and designer series paper from my niece. She’s currently going through the “I love unicorn” stage and will do her best to persuade me to part with the stamp and let her have it. She’s only eight but loves to come and craft with me..

Magical Day
Left – Karen Franks, Top Right – Pauline Barnfather, Bottom Right – Sue Hookins
Karen stamped her unicorn and cut it out using the co-ordinating die from the Magical Mates Framelits Dies. You can purchase the stamps and dies individually or as a bundle saving 10%.  The stripes behind the unicorn are simple strips of cardstock. 
Pauline used her Brusho Watercolor Crystals for her unicorn background, and the rays peeking out from behind come from the Amazing You stamp set.
Sue used Stampin’ Blends to colour her dragon. The image is stamped on White Shimmer Paper which catches the light but does not photograph too well.
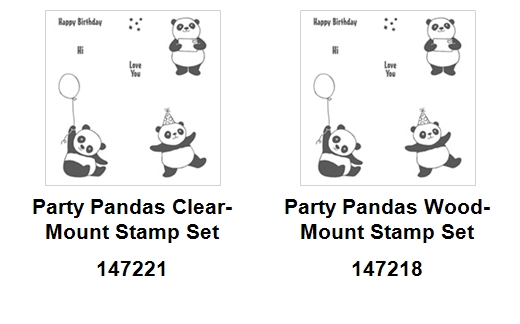
The third group feature the Party Pandas stamp set. Another one in the Sale-A-Bration Catalogue.

The three images in the stamp set have a panda in various poses – sitting with a balloon, holding an envelope with a heart on, and dancing with a party hat on. There is also three sentiments and a small background stamp.

Party Pandas

Left – Bridget Metcalf, Right – Susanna Tolkien

Bridget made a cute bookmark using a strip of Whisper White and punched one end with the Scalloped Tag Topper Punch. The panda was stamped and heat embossed and the little red heart was punched from some red glimmer paper. The balloon, hat and present were cut from the Birthday Memories Designer Series Paper, that’s one heck of a lot of fussy cutting when you are making 21!

Susanna’s panda is stamped direct to the Whisper White card stock and the heart was coloured in. The Linen Thread wrapped around the Whisper White adds that little bit of extra interest. Very simple but very cute.

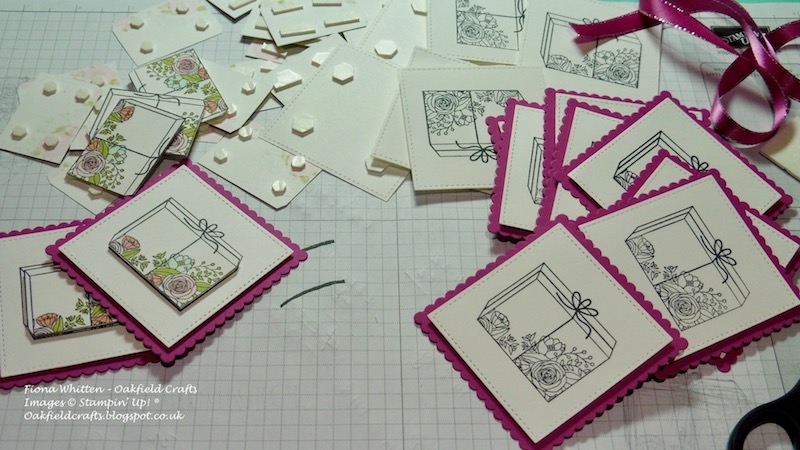
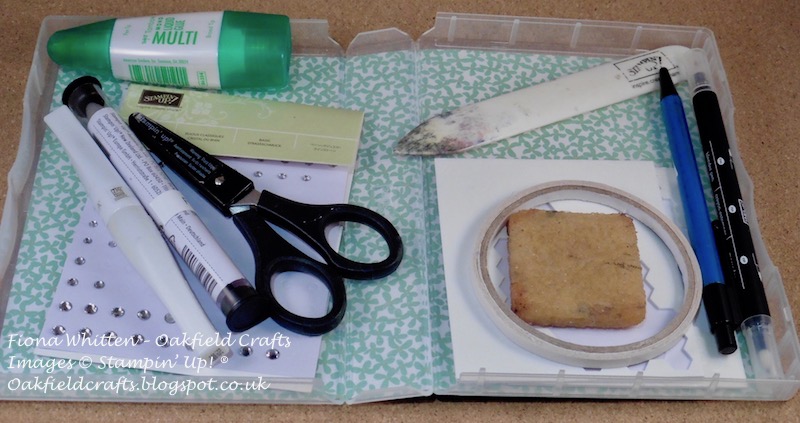
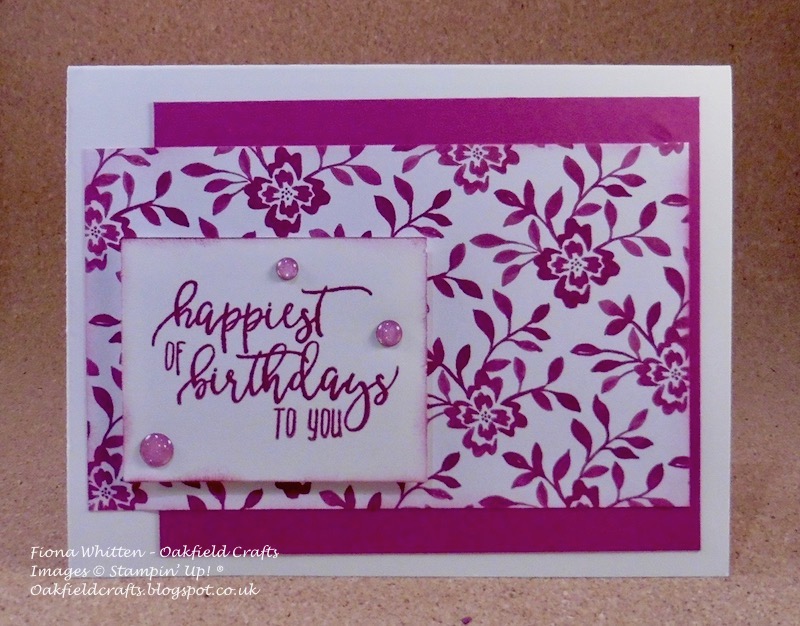
The last one for today is my swap. I was the only one who used the Cake Soiree stamp set.


I started by embossing a piece of Whisper White cardstock with one of the pretty embossing folders from the Petal Pair Textured Impressions Embossing Folder and then adhering the cardstock to a piece of Berry Burst cardstock.

Cake Soiree, Oakfield Crafts, Swaps

I then die cut some Whisper White cardstock with the largest square from the Stitched Shape Framelits and stamped the present image in Memento Tuxedo Black Ink. I then restamped the present  onto some more Whisper White cardstock and coloured the flowers using Stampin’ Blends.

Once all the images on the scrap were coloured I then fussy cut part of the image out. You can make out the part (top left of the photo below).  I was actually doing all of this at 4.00 am thanks to the storm/gale blowing outside!
To finish off the front of the card I die cut a large scallop square using my Layering Square Framelits and adhered the stamped Stitched Shape Square to it using Stampin’ Dimensionals.

I then added the fussy cut/coloured image to the front using Stampin’ Dimensionals. The final touch is a piece of the Berry Burst Metallic Edged Ribbon which I folded over and adhered to the back of the Berry Burst Scallop Square.

I hope you have enjoyed all the cards that I’ve shared today and I’ll be sharing the rest soon.

Happy stamping.

Fiona xx

Stampin' Stars Team Swaps

Last weekend I was involved in two days of training . On Saturday we had the Online Team Training which was done through FaceBook Live and on the Sunday I travelled to the Stampin' Stars team training over in Crawley.

Today I'm sharing photos and details of some of the swaps I received last Sunday.

swaps, 2018 Sale-A-Bration, 2018 Spring/Summer, Cake Soiree

Here's all of the swaps I received - all 21 of them. I'll walk you thorough them a few of a time and I've also grouped them per stamp set (to try and keep it simple).

Altered Petal Passion Designer Series Paper Classes - 9 & 10 February

Prep is in full swing for February’s regular monthly classes and the deadline for booking onto the classes or ordering the kit is fast approaching. In fact, it’s this coming Sunday – 28 January.

We will be using the fabulous black & white Petal Passion Designer Series Paper and altering it to give different looks.

It’s going to be inky fun making the four cards, and here’s one of them.

Techniques, Petal Passion, #oakfieldcrafts, #stampinup
This card features an ombre effect that was made using a sponge brayer. We’ll also be colour washing, stamping and using some Stampin’ Blends. It promises to be inky fun.
The class options are –
9 February from 7.30 pm to 10.00 pm or
10 February from 10.00 am to 12.30 pm
The class costs £20.00 and you will receive a kit which will contain at least £15 worth of Stampin’ Up! products. What you don’t use can be taken home with you.
You will need to bring a basic craft kit (trimmer, scissors, glue, bone folder etc) and anything else you think you might need such as glasses.
Can’t make the day? Then you have the option to purchase the class as a kit. All the items in the kit will be mailed to you on 9 February and the instructions will be sent via email that day too. The kit costs £20.00 plus £3.00 to cover P&P. If you are able to collect from me then there will be no P&P to add. Any die cutting or embossing will be done for you and you can substitute your own sentiment stamps because the Stampin’ Up! angel policy does not permit me to send stamped images.
Payment for the class or kit can be made by Bank Transfer or Paypal. Please email me for the details if you don’t already have them.
Space is limited to 10 people for each class so if you haven’t already emailed me to book your spot please do so ASAP. Don’t forget that payment is required by 28 Jan too because I need to order supplies that night.
If you have any questions please get it touch by email.
Happy stamping
Fiona xx
Current promotions
Sale-A-Bration : Shop, Join, Host
2018 Spring/Summer Catalogue : See it now

Altered Petal Passion Designer Series Paper Classes - 9 & 10 February

Prep is in full swing for February's regular monthly classes and the deadline for booking onto the classes or ordering the kit is fast approaching. In fact, it's this coming Sunday - 28 January.

We will be using the fabulous black & white Petal Passion Designer Series Paper and altering it to give different looks.

It's going to be inky fun making the four cards, and here's one of them.

Alaska Achievers Global Blog Hop - January 2018

It’s that time of the month for the Alaska Achievers Monthly Blog Hop. This is a group of Stampin’ Up! Demonstrators from around the world who have achieved the Alaska trip. We will be heading to Alaska in July, but in the meantime we have lots of things to share with you each month.

My project for this blog hop features the Perennial Birthday stamp set. This is my current favourite – probably because I’ve only recently opened the box and inked the stamps. LOL.

Perennial Birthday, Blog Hop, #Oakfieldcrafts, #Stampinupuk
One of the big dilemmas I have when making a card is whether to make it in the “normal” vertical (portrait) format or turn it 90° and make it into a horizontal (landscape) card.  
I had real issues with this one and right until the last minute when I added the sentiment it was going to be a portrait style card.
To make the card, I used Washi Tape to mask the sides before stamping the flower images. I then carefully removed the tape because the ink does not dry too well on it and I didn’t want to transfer some onto the card front. Luckily the tape came off easily and cleanly.
With the tape removed I used my Stampin’ Blends (Bermuda Bay, Calypso Coral, Old Olive and Pool Party) to colour the images.
The whole thing was then matted onto a piece of Pool Party cardstock. I added the sentiment and then also wrapped a piece of Pool Party Shimmer Ribbon around the whole thing and tied it in a knot.

Perennial Birthday, Blog Hop, Incentive Trip, #Oakfieldcrafts, #stampinupuk
My next dilemma was whether to use a Calypso Coral or Old Olive base card. I ended up with a Basic Black one instead! Admittedly, Basic Black would not be my normal choice but it worked really well for this card so I decided to stick with it.
Those of you who know me, know that I hate to send a naked envelope and that I always decorate the inside of my cards too. I don’t always stamp inside the card – sometimes I will use some co-ordinating Designer Series Paper but this time I did stamp. One tip for stamping and colouring the envelope. Make sure you have a scrap of cardstock in the envelope to absorb any ink from the Stampin’ Blend because it will bleed through.

Don’t forget the amazing offers available at the moment. If you live in the UK you can –

  • Shop with me (use January’s monthly code 7WEXPDYM if your order is less than £150 and you will receive a little something extra from me) and for each £45 spend you can choose an item from the Sale-A-Bration Catalogue, or better yet
  • Join my group of Acorns. Now is such a great time to join because not only do you get to choose £130 worth of product for just £99 but you also get to choose 2 EXTRA stamp sets (from either of the Annual or 2018 Spring/Summer Catalogues) for FREE. You can squirrel those extra sets away to play with on a rainy day or start playing with them the minute you receive them.
Thank you so much for stopping by today and checking out my project. You are currently with me – Fiona Whitten so don’t forget to click on the next person’s name on the list below to see what fabulous project that they have to share. Also, don’t forget that you can continue with the hop anytime, so feel free to pop back.

Happy stamping

Fiona xx

My project supplies are as follows

Alaska Achievers Global Blog Hop - January 2018


It's that time of the month for the Alaska Achievers Monthly Blog Hop. This is a group of Stampin' Up! Demonstrators from around the world who have achieved the Alaska trip. We will be heading to Alaska in July, but in the meantime we have lots of things to share with you each month.

My project for this blog hop features the Perennial Birthday stamp set. This is my current favourite - probably because I've only recently opened the box and inked the stamps. LOL.

CAS Colours & Sketches - Challenge #256

This week Bev has a sketch for us to try and it looks like this.

I have a lot of unused stamp sets sitting on my shelf at the moment so I decided to christen one for this challenge. It’s called Perennial Birthday and I love it. The stamp set has a co-ordinating kit but I’ve not used that for the challenge.

Perennial Birthday, card challenge, #oakfieldcrafts, # stampinupuk
I tried to think a little outside the box this week and as you can see, I’ve cut around the flower and through the sentiment with a circle die. The circle is glued to the Calypso Coral layer beneath, and then the rest of the Whisper White layer is popped up on Stampin’ Dimensionals.
I have to admit that I am really pleased with how this card turned out and I completed it by stamping both the inside of the card and the back of the envelope too.

card challenge, #oakfieldcrafts, #stampinupuk
I coloured the flower and leaves using my Stampin’ Blends in Calypso Coral, Old Olive and Pool Party. They are alcohol markers which meant that I used Tuxedo Black Memento Ink for stamping the images and sentiment. 
I hope you like the card and leave a comment and,  don’t forget to stop by the CAS Colour & Sketches Blog to see what the other members of the Design Team have been up to.
Happy stamping.
Fiona xx
Details of products used are as follows:

CAS Colours & Sketches - Challenge #256

This week Bev has a sketch for us to try and it looks like this.


I have a lot of unused stamp sets sitting on my shelf at the moment so I decided to christen one for this challenge. It's called Perennial Birthday and I love it. The stamp set has a co-ordinating kit but I've not used that for the challenge.

The Winner is...

Congratulations to Joyce Kelly who has won the pair of tickets to the Crafting Live Show this coming weekend over at the Sandown Park Racecourse, Esher.

If you are planning on visiting the show this coming Friday or Saturday please stop by the Stampin’ Up! stand. We can be found on L1 and I’d love to say hello.

Happy stamping.

Fiona xx

The Winner is...


Congratulations to Joyce Kelly who has won the pair of tickets to the Crafting Live Show this coming weekend over at the Sandown Park Racecourse, Esher.


If you are planning on visiting the show this coming Friday or Saturday please stop by the Stampin' Up! stand. We can be found on L1 and I'd love to say hello.

Happy stamping.

Fiona xx

Pandamonia with Party Pandas

Apologies I just couldn’t resist using the title. A little corny I know, but it just had to be done.

In case you hadn’t realised, today I’m featuring the Party Panda stamp set. It’s from the Sale-A-Bration catalogue which means it’s free with a £45 spend.

The set of 7 rubber stamps are available in both Clear or Wood Mount.

These are the projects that I made using the stamp set and the very easily missed new Whisper White Narrow Note Cards & Envelopes (page 19 of the 2018 Spring/Summer Catalogue).

Party Panda, Oakfield Crafts, Stampin' Up! Uk, Sale-A-Bration 2018
These cards were pretty quick and simple to make using all three of the Panda images and also all three of the sentiments. Obviously, you can mix and match the sentiment with the image you prefer. 
Each envelope was stamped to co-ordinate with the card and I also added a semi circle of Picture Perfect Party Designer Series Paper to the outside flap of the envelopes.
Once I’d finished making the cards, I also made a box to keep them in.
Gift Box, 3D, Oakfield Crafts, Stampin' Up! UK, Sale-A-Bration 2018
The box itself was made using Thick Whisper White cardstock and the Lots to Love Box Framelits Dies. You need to use the die twice to make the front and back pieces. Remember to glue the pieces together so that there is a flap at each end (assuming you want to flaps). Also, be sure to fold and burnish the flaps before you glue the box together. This makes it much easier to tuck the flaps in once the box is made up.
The finished box measures 12.4 x 7.6 x 1.6 cm. Just perfect for the cards and their envelopes. In fact, you can fit more than three of each in the box. But, much depends on whether you have added any thing to the front of the cards. My cards are flat so you could easily fit five in.
For the front of the box I stamped the panda with the balloon (onto a piece of 7.0 x 10.0 cm piece of Whisper White) and used my Bermuda Bay Stampin’ Blends to colour the balloon. I then re-stamped the balloon two more times onto some scrap paper and coloured them using the Pool Party and Bermuda Bay Stampin’ Blends. 
I also used my Colour Lifter to add the highlights on each of the balloons.  The two extra balloons were then cut out and added to the image using Stampin’ Dimensionals and the strings were added using a Stampin’ Write Marker (before I added the balloons).
Enjoy the rest of your weekend. I’m off to a training event tomorrow, and I don’t need to do anything for it other than my swaps which are already finished. Yippee.
Happy stamping.
Fiona xx
Details of the products used are as follows: 

Pandamonia with Party Pandas

Apologies I just couldn't resist using the title. A little corny I know, but it just had to be done.

In case you hadn't realised, today I'm featuring the Party Panda stamp set. It's from the Sale-A-Bration catalogue which means it's free with a £45 spend.

The set of 7 rubber stamps are available in both Clear or Wood Mount.

These are the projects that I made using the stamp set and the very easily missed new Whisper White Narrow Note Cards & Envelopes (page 19 of the 2018 Spring/Summer Catalogue).

Ten things I couldn't craft without

I’m often asked by people as to what are the things that I couldn’t craft without. The list is pretty long, but I thought I’d share my top ten.

1. My Stampin’ Trimmer. I’m sure that every crafter has their own favourite trimmer, but I love my Stampin’ Up! one. Why? Well it’s more than just a trimmer because it has both a cutting blade and scoring blade on the arm, and you don’t need to remove one to be able to use the other. That for me is the biggest time saver ever. There’s even a place underneath the trimmer to store new blades and other things such as a bone folder.

2. My Bone Folder. A neat crisp fold on a card is a must in my books. So, a bone folder is something that sits in my Basic Craft Kit and goes with me when ever I go out to craft. I also use it to help curve cardstock because it helps to breakdown the fibres. One other use that is a little out there, is helping me re-ink my ink pads.  People always comment on the colourful bone folders I have sitting in various pots in my craft room. I use them to spread the ink on the ink pad when I’m using the refills to re-ink the pads.

3. My Stampin’ Scrub and Stampin’ Mist. These have to go together and make my life so much easier when it comes to cleaning my stamps. I don’t like to put my stamps away dirty and I’m not over keen on using baby-wipes mainly because they leave fibres on the stamps which over time build up on the ink pads.

The stampin’ scrub makes cleaning the stamps quick and easy. Simply spray some Stampin’ Mist on the side that has the little rain drops and then rub the stamp on it to clean it. You then rub it on the other pad to dry it. If the pad gets really dirty I clean it my running it under the tap with washing up liquid or leave it to soak overnight in the sink.

4. Grid Paper.  Sounds silly but this is something that is always on my craft table. I use it for my notes from meetings, telephone calls, classes etc. I also use it to help me line up my projects when stamping or gluing strips or layers onto a card. The grids provide a useful point of reference to ensure things go on straight.

I also use it to help me line up my stamps on the blocks – the lines show through the blocks and you can use them as reference and of course the ruler on each side (cm on one side and inches on the other) makes for quick and easy measuring of cardstock and ribbon.

5. Magnetic Plate for the Big Shot. This has made my die cutting so much quicker and is a must have if you have a Big Shot and have lots of dies that co-ordinate with stamp sets. It makes the lining up much easier. Admittedly there is a down side if you have very small dies because they like to jump to the nearest magnetic. But that’s where the sticky notes still come in handy!

Please note that the Magnetic Platform is not for everyone, especially people with pacemakers. As a result I still have my old fashioned folding plates for use in class.

6. My Acrylic Blocks.  Over the years I have tried many different sorts of blocks for my clear mount stamp sets – thin ones, ones with printed lines on etc, etc. In the end I’ve bought the whole range of Stampin’ Up! ones. They have curved edges and a groove around the middle of them so that when you pick them up your finger tips rest neatly in the groove. They are probably the most ergonomic (long word) ones ever and they simply feel good in your hand. Sounds silly I know but people who come to class love them the first time they use them.

7. Stampin’ Dimensionals. Although I like to make clean and simple cards I love to use dimensionals too. They add that little extra something to the card that takes it just that one step further. These are something that I keep in my Basic Craft Kit and I seem to go through them at a vast rate at times because I’m forever having to add them to an order!

8. Scissors/Paper Snips. Scissors and paper snips come in a variety of different shapes and sizes. They are also very personal things and everyone has their own personal preference. Me, I love my paper snips – they never seem to get blunt (sticky maybe – but that’s easily removed) and I’ve had them for years. These are another of those items that sit in my Basic Craft Kit.

9. Glue/Adhesive. Are you a glue or tape person when it comes to adhesives? I like both but for card making I prefer glue. A little goes a long way and it gives you a little wiggle room to move the layer around a little. Once you have adhered something using tape there’s no going back.  My Tombow Multipurpose Glue is another of those things that sits in my Basic Craft Kit. Like Dimensionals, it is something I seem to go through at a vast rate of knots.

10. Embellishments. Where do I start? There are so many options but my go-to items are Basic Rhinestones and the Clear Wink of Stella. Let’s face it, who doesn’t love a bit of bling or sparkle? These too sit in my Basic Craft Kit.

So what does my Basic Craft Kit have in it? There are a few more things not on the list above (and obviously some things on my list wouldn’t fit) but this is a great way of keeping it all together in one place.

I use a large wood mount stamp case to keep everything in and I’ve decorated the box too.  This was made some years  ago so the paper and dies have now retired.
I did actually make one for each of my team (way back in December 2015) and when we go to Stampin’ Up! events we always receive compliments about them.
New team members don’t miss out because everyone who joins my team receives a personalised box along with some TomBow and Tear & Tape Adhesive.
Leave a comment and let me know what items you can’t craft without.
Happy stamping.
Fiona xx
Current Promotions
  

Ten things I couldn't craft without

I'm often asked by people as to what are the things that I couldn't craft without. The list is pretty long, but I thought I'd share my top ten.

1. My Stampin' Trimmer. I'm sure that every crafter has their own favourite trimmer, but I love my Stampin' Up! one. Why? Well it's more than just a trimmer because it has both a cutting blade and scoring blade on the arm, and you don't need to remove one to be able to use the other. That for me is the biggest time saver ever. There's even a place underneath the trimmer to store new blades and other things such as a bone folder.

CAS Colours & Sketches - Challenge # 255

It’s Tuesday, so time for another challenge from the CAS Colours & Sketches design team. This week Bev has a fun colour challenge for us.

I really like this colour combination and a number of options raced through my head. In the end I decided to go with one of the new stamp sets from the 2018 Spring/Summer Catalogue. It’s called Birthday Wishes for You.

challenge, Birthday Wishes for You, Stampin' Up! UK, Oakfield Crafts
The card was pretty simple to make, as follows –
  • Base Card – Thick Whisper White measuring 10.5 x 29.7 cm scored at 14.9 cm.
  • Whisper White cardstock panel measuring 10.0 x 14.4 cm
  • Wisteria Wonder cardstock measuring 10.0 x 4.8 cm – glued to the top of the Whisper White panel.
  • Perfect Plum cardstock measuring 10.0 x 4.8 cm – glued to the bottom of the Whisper White panel.
  • Soft Sky cardstock measuring 10.0 x 4.8 cm. Large sentiment stamped in Tuxedo Black in the centre.
  • Scrap of Perfect Plum with “Happy” banner stamped in Tuxedo Black and cut out using paper snips.
  • Scrap of Wisteria Wonder with the second stamp from the set stamped in Tuxedo Black and cut out using paper snips.
  • Adhere the Soft Sky cardstock to the middle of the Whisper White panel using Stampin’ Dimensionals.
  • Fix the Perfect Plum and Wisteria Wonder banners to the Soft Sky panel using Mini Stampin’ Dimensionals.
  • Fix the Whisper White panel to the base card using Stampin’ Dimensionals and then add some basic rhinestones.

Here’s a view of the card from the side.

Birthday, Challenge, Stampin Up, Oakfield Crafts

I hope you like the card and as always please feel free to leave a comment. Also, don’t forget to pop over the CC&S blog to see what the other members of the design team have been up to.

Happy stamping.

Fiona xx

My supply list – click on a picture for more info in my On-Line Store


Current Stampin’ Up! promotions

Sale-A-Bration 
2018 Spring/Summer Catalogue

CAS Colours & Sketches - Challenge # 255


It's Tuesday, so time for another challenge from the CAS Colours & Sketches design team. This week Bev has a fun colour challenge for us.


I really like this colour combination and a number of options raced through my head. In the end I decided to go with one of the new stamp sets from the 2018 Spring/Summer Catalogue. It's called Birthday Wishes for You.

San Diego Shoe Box Swap

I’ve just returned from two weeks away in not a so sunny San Diego. While I was there I visited with my friend Cynthia McQueen.

Cynthia is also a Stampin’ Up! demonstrator and we try to get together when I’m over there. This time around I was lucky because I was able to go one of Cynthia’s Royal Court team meetings. Of course there was a little business talk, but most of the evening was taken up with a Shoe Box Swap.

I’ve not taken part in a Shoe Box Swap before so was intrigued as to what it was all about.  Basically, everyone attending designed a card (criteria was to use products from either the Spring/Summer or Sale-A-Bration catalogue) and made up enough kits for everyone to taking part. We then spent the evening making the cards and chatting.

These are the cards that I made. Sadly, I’m terrible with names (I need to meet someone a few times before it sinks in) and can’t recall everyone who designed these cards but I’ve added names for those that I do know.

Flying Home – Cynthia
Petal Palette – Vicki
Heartfelt Blooms

Picture Perfect Birthday – Leticia
Picture Perfect Birthday – Debby
Amazing You – Fiona (me)


I think you will agree that they are a fabulous collection of swaps and I know that I will be CAS a few of them.

Happy Stamping.

Fiona xx

Details of some of the products used can be found here – click on each picture below for more info.

The Petal Palette stamp set also has a set of co-ordinating dies which are available in a bundle saving you 10%. The bird and branch on the card were fussy cut using paper snips.

Both the Heartfelt Blooms and Amazing You stamp sets are Level 1 Sale-A-Bration sets which means that they are free with a £45 spend.