Pages

Showing posts with label Kit. Show all posts

Happy Birthday

It turned out that I had not one, but two birthday cards to make in a hurry yesterday and to top it all they were for a married couple.

Having limited supplies with me, I thought I would make use of the Hip Hip Hooray card kit for one of the cards and use some of the Designer Series Paper that I had left over from my last visit together with a couple of the stamp sets and framelit dies that I brought over in my hand luggage this trip.


Although it was Julie's 50th birthday I don't have any number stamps or dies with me, but one of the greetings from the Another Great Year stamp set had just the right message that I wanted to convey. I also had to make an envelope using my Envelope Punch Board because I did not have any standard UK sized ones with me.


Tom's card was made using the Hip Hip Hooray card kit. This is a great kit as the colours lend themselves to cards for both men and women. I kept this one neutral but could have used other colours which would have made it more feminine.

I'm sorry to say that we had to leave the party before all the presents and cards were opened, so I hope that they both liked their respective cards.  I had to get up early this morning for a 8.00 am flight and I'm now sitting in a hotel in Savannah, Georgia writing this. This is supposed to be a quick post as I promised to share a photo and now we are off out to find some dinner.

Tomorrow we have a tour of the university that Michael is interested in (Savannah College of Art and Design, aka SCAD) and Tuesday we get back on the plane (two actually) back to San Diego. I certainly can't say that life is boring in the Whitten household.

Stampin' Up! supplies used:

Have kit will travel

My intention this morning was to make this a quick post but now that I've started it might just be a bit longer than planned.

I'm off to the USA today for a whole month! I'd like to say that I'll be on holiday but no such luck because the trip involves two college tours (for Michael) and a trip to help Jenny pack up her dorm room. Her first year at college ends 1 May and I'm immensely proud of her. She has adapted to college life (with a few amusing hic-ups along the way) and has also managed to have some of her work from Merrist Wood transferred. This means she is academically now at the end of her second year.

I was planning on taking a couple of Stampin' Up! kits with me to the USA, but because we are travelling with hand luggage only, I have decided that I'm going to have to leave one of them behind. I don't normally do kits but there are two new(ish) that I've had my eye on. I've decided not to take the Happenings Simply Created Card Kit, so I opened it last night to have a quick play.


My tip is to stamp the banners before punching them out. It is much easier to stamp them while they are still part of a larger sheet and the Stamp-A-Ma-Jig is a great tool to make sure that the images are straight.


The kit comes with a sheet with a few printed ideas on it, but I like to come up with my own. Who says you can't cut up some of the pre-printed elements to make some fun shapes. The card above left has part of a circle, and the tag bottom left has been altered too.


The kit contains supplies to make 15 cards but with a bit of imagination all the "scrap" can be utilised too and far more cards can be made.

I think that this kit is great for both new card makers and those of us who have been crafting for years. It's a great go to kit if you need to put together a quick card or two, or if you are just starting out and need a little bit of help with ideas.

Well, I guess I ought to go get some packing done. I will have some exciting news to share on Wednesday although I hope to get another post in before then.


A Week of Contempo Christmas - Part 7

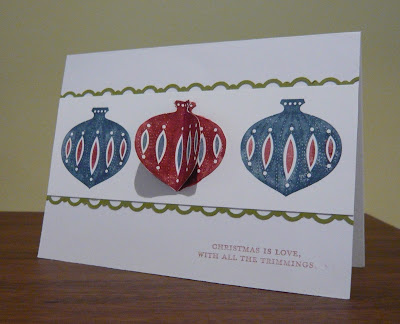
Here is the last card in the series A Week of Contempo Christmas. My aim for the week was to design seven cards using one set of stamps and to keep the designs as simple as possible. I hope you think that I have achieved this.

As this is the last card, I thought I would add an extra dimension to it. I really love the 3-D effect on the middle ornament but the great thing is that it folds flat for postage.


I hope you have enjoyed looking at the cards as much as I have enjoyed making them. Your comments would be appreciated.


If you don't already have the Contempo Christmas stamp set and are interested in making the cards in this series (and obviously be able to come up with your own designs too), please check out the Kit that I have on offer. Click on the following link for details Kit Offer.

If you already have the stamp set but are interested in purchasing any of other supplies, please contact me, Fiona Whitten.

A week of Contempo Christmas - Part 6

Here is the sixth in the series of A Week of Contempo Christmas. 

As this is the penultimate card I decided to use the Christmas Tree stamp. This is such a cute tree - and this time round I decided to stamp it in one colour only.  You may notice that I have also stamped the tree on the Real Red card stock too. By using the same ink colour as the card stock you end up with a very subtle effect, great for making backgrounds.


The tree was stamped three times and then the whisper white card stock was matted onto a piece of Real Red card stock. The message was stamped in the bottom right and once the real red background had been stuck onto the left-hand side the christmas tree images were stuck on using Stampin' Dimensionals.

I have a Contempo Christmas kit of offer, please check out the following if you are interested in making all the cards in the series and don't already have the Contempo Christmas stamp set.  Kit Offer.

A Week of Contempo Christmas - Part 5

I hope that you have enjoyed the cards that I have posted so far. 

This design is the fifth out of the seven that I am posting as part of my Week of Contempo Christmas - seven simple card designs made using only one set of stamps.


The card features the ornament stamp from the set. I used three of the Stampin' Write Markers from the Regals Collection. This set of 10 markers together with the Contempo Christmas stamp set forms part of the kit that I have put together. Details of the kit are shown on my previous posts, or please click here for more information Comptempo Christmas kit.

A Week of Contempo Christmas - Part 4

This is the fourth card in the series of seven using the Contempo Christmas stamp set. As I said in the first post of this series, my aim is to try and keep the cards as simple as possible and I hope that I have succeeded so far.

Please check out the photos of the other cards that I have posted so far. 


I used Old Olive and Real Red Stampin' Write Markers to colour the tree stamp (but not the star at the top). The tree was stamped twice onto the card and then a third time onto a scrap of Whisper White card stock. The third tree (once cut out) was stuck onto the card using Stampin' Dimensionals.

The Merry Christmas message from the Contempo Christmas set was stamped in Real Red into a scrap of Whisper White card stock and then punched out using the Oval Punch. This was then stuck onto a piece of Real Red card stock that had been punched out using the Decorative Label Punch.

A strip of the new Chocolate Chip 1/2" Scallop Polka Dot Ribbon was adhered across the card and then the message was stuck over the top using Stampin' Dimensionals.

If you would like to make the cards, I am offering a kit containing:
  • The Contempo Christmas wood mounted stamp set - See page 25 of the 2011-2012 Idea Book & Catalogue
  • The Regals Collection Stampin' Write Markers (set of 10) - See page 93 of the 2011-2012 Catalogue
  • Basic Black, Old Olive and Real Red Stampin' Write Markers
  • 1m of Real Red 1/8" Taffeta Ribbon - See page 107 of the 2011-2012 Catalogue
  • 1m of Chocolate Chip 1/2" Scallop Dots Ribbon - See page 107 of the 2011-2012 Catalogue
  • A pack of Stampin' Dimensionals
  • Instructions on how to make each of the cards plus a sample of each (card front only)
The price for all of this is £50.00 including postage and packaging.  

If you would prefer to receive the clear mounted stamp set, the price would be £47.00 but you would require a clear reusable block to mount them on. If you do not already have one, a clear block Size D (see page 127 of the 2011-2012 Catalogue) would be suitable and can be added for £6.50.

Please let me know at the time of ordering whether you prefer the wood-mounted or clear-mount set and if clear, whether you require the block as well.

You can contact me by clicking the following link Fiona Whitten

A Week of Contempo Christmas - Part 3

This is the third card in the series of seven that I made using just one set of stamps, Contempo Christmas. For this card I have reverted to the Christmas ornament from the set.


The ornaments are so simple to make and by using the Stampin' Write Markers, you can have whatever combination of colours you desire. Have fun playing with the different combinations and then everyone can receive something slightly different.

For these ornaments I used the a combination of More Mustard, Garden Green and Cherry Cobbler. All of these are part of the Regals Collection of Stampin' Write Markers that form part of the card kit on offer. See below for details. Once the ornaments had been stamped onto Whisper White card stock they can be cut out using scissors or punched out using the Ornament Punch.

The greeting was stamped in Cherry Cobbler and then the ornaments were fixed to the card using Stampin' Dimensionals.

If you would like to make the cards, I am offering a kit containing:
  • The Contempo Christmas wood mounted stamp set - See page 25 of the 2011-2012 Idea Book & Catalogue
  • The Regals Collection Stampin' Write Markers (set of 10) - See page 93 of the 2011-2012 Catalogue
  • Basic Black, Old Olive and Real Red Stampin' Write Markers
  • 1m of Real Red 1/8" Taffeta Ribbon - See page 107 of the 2011-2012 Catalogue
  • 1m of Chocolate Chip 1/2" Scallop Dots Ribbon - See page 107 of the 2011-2012 Catalogue
  • A pack of Stampin' Dimensionals
  • Instructions on how to make each of the cards plus a sample of each (card front only)
The price for all of this is £50.00 including postage and packaging.  

If you would prefer to receive the clear mounted stamp set, the price would be £47.00 but you would require a clear reusable block to mount them on. If you do not already have one, a clear block Size D (see page 127 of the 2011-2012 Catalogue) would be suitable and can be added for £6.50.

Please let me know at the time of ordering whether you prefer the wood-mounted or clear-mount set and if clear, whether you require the block as well.

You can contact me by clicking the following link Fiona Whitten