Pages

Showing posts with label Let's Talk. Show all posts

Let's Talk - Card Bases and how to make them

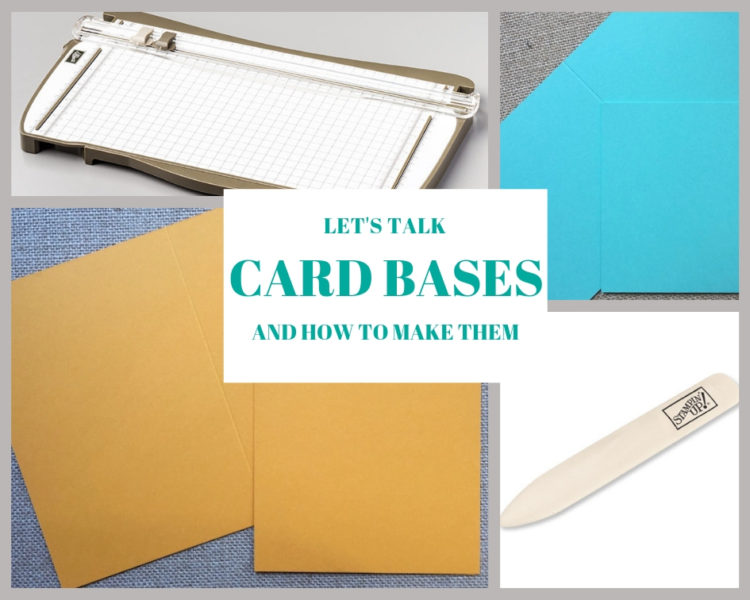
Let’s be honest, there are times when we the easiest and quickest route when it comes to card making. Pre-cut cards are great and serve a purpose but more often or not, we want to have a different coloured card base. Not everyone knows where to cut and where to score when it comes to a sheet of A4 card stock. Hence this latest Let’s Talk – Card Bases and now to make them.
Let's Talk - Card Bases

Here in the UK, card stock comes in A4 sheets which is a standard 21.0 x 29.7 cm (or 8.27″ x 11.69″). This is longer but narrower than the standard US card stock size (commonly known as letter size in the USA).

A6 cards

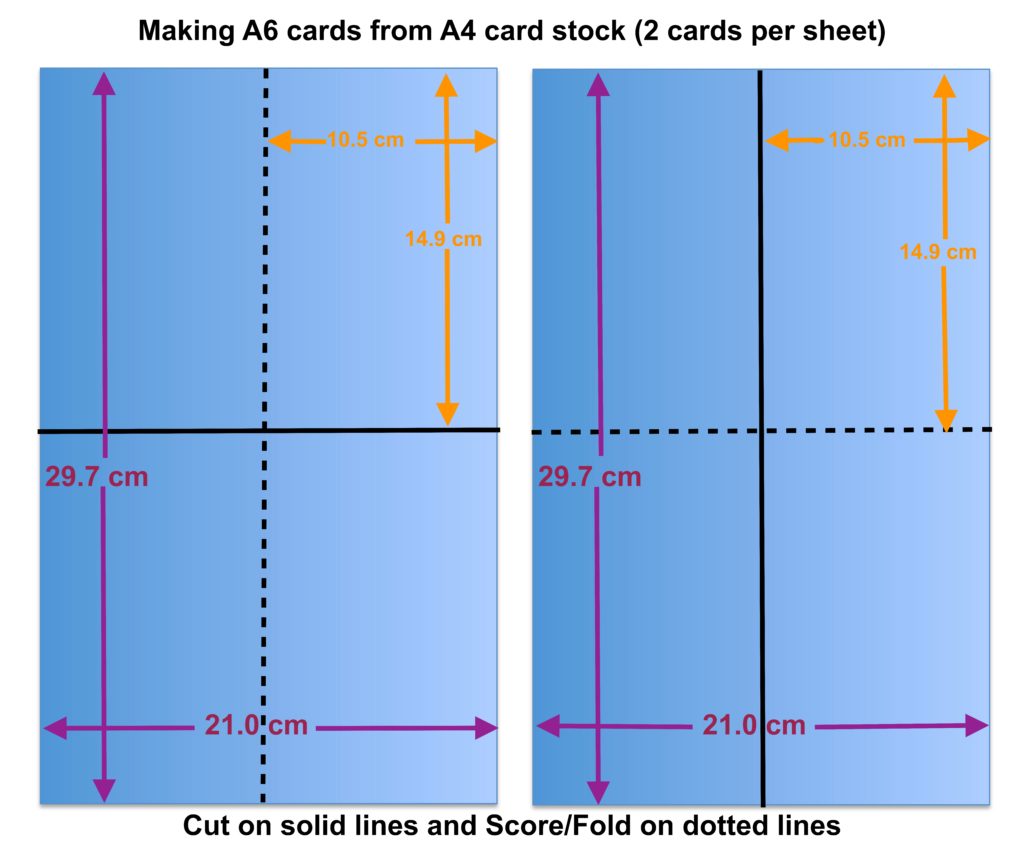
A standard card is an A6 card which is made from a piece of A5 card. Confusing? The thing to remember is the higher the number the smaller the piece of card stock! It’s probably easier to show you. Please note that the diagrams are not to scale.
Let's Talk - Card Bases

Each A4 sheet will provide two A6 cards.

  • The illustration on the left will give two cards with the fold that runs down the left when using in a portrait position and along the top when using in a landscape position.
  • The illustration on the right will give two cards with the fold along the top when using in a portrait position and along the left hand-side when using in a landscape position.

Square cards

Some people prefer to make and send square cards. I do make them on occasion, but tend not too simply because they are not as economical when it comes to cutting from A4 card stock.
Let's Talk - Card Bases

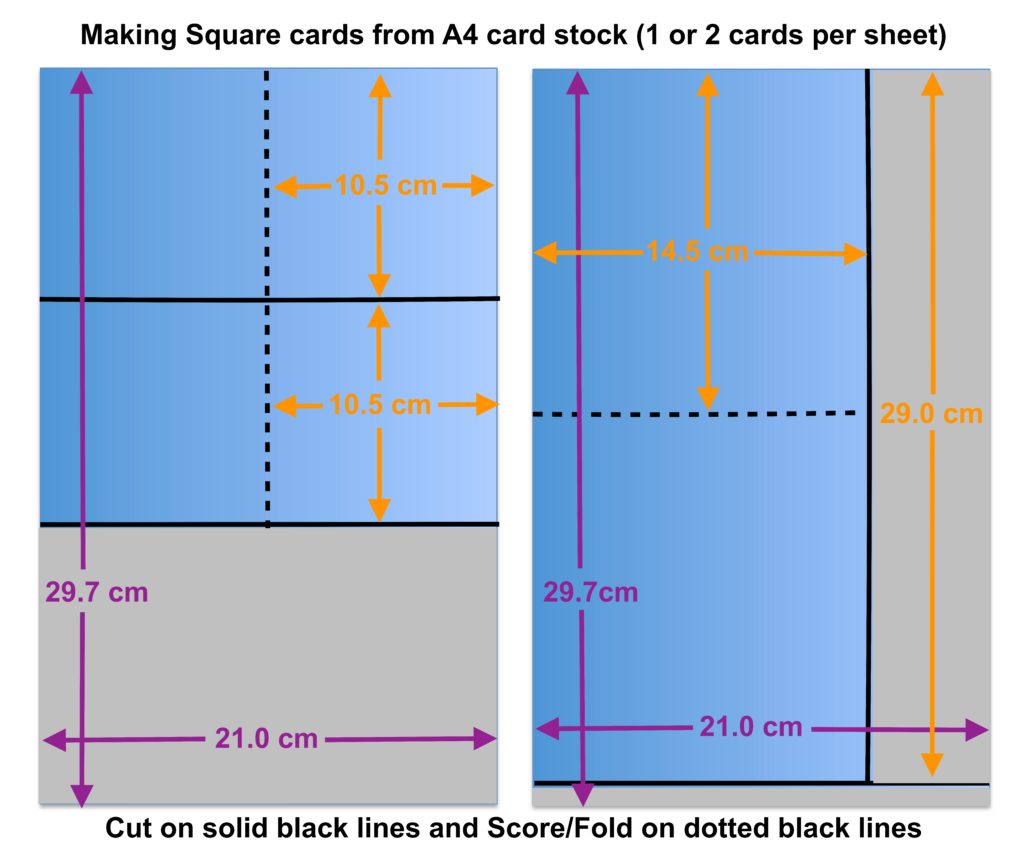
Each A4 Sheet will provide

  • 2 square cards measuring 10.5 x 10.5 cm square (diagram on left) or
  • 1 square card measuring 14.5 x 14.5 cm square (diagram on right).

It’s also possible to cut other sizes, you need to remember that for a square card one length needs to be twice the other.  Eg. If you want to a 10.0 x 10.0 cm card you need a piece of cards stock that measures 10.0 x 20.0 cm.

When making your own card bases you will need the following tools in addition to your chosen card stock

  • Paper Trimmer
  • Scoring Tool
  • Bone Folder

I can help you with all of these. The Stampin’ Trimmer has both a cutting and scoring blade and there is no need to take one off in order to use the other. You can find out more by visiting my Online Store. Alternatively click on the images below.

All of the information above it available as a printable document and can be found in the Tutorials Section of this blog.

I hope you have found this Let’s Talk – Card Bases and how to make them useful. You’ll find others in the series as follows:

  1. Let’s Talk – Stamps
  2. Let’s Talk – Ink
  3. Let’s Talk – Paper
  4. Let’s Talk – Adhesives
  5. Let’s Talk – Tools for a Basic Craft Kit

Happy stamping.

Fiona xx

Ways to shop and save in March

2019 Sale-A-Bration  – lots of ways to earn free things. Join, Shop or Host the choice is yours.

Join my Team – Choose your own starter kit. During Sale-A-Bration you get to choose £170 worth of product for £99 (includes P&P) or add the Craft & Carry tote (worth £47) and pay £125. You then receive a 20% discount on future orders/purchases (for at least 3 months). This is a great way to start your own Stampin’ Up! business or simply make your crafting funds go further.  If you would like more information please contact me at fiona@oakfieldcrafts.com.

Save 10% on Bundles from the catalogues. There is something for everyone simply because there are an amazing number to choose from.

Clearance Rack

Supply Lists for Let’s Talk – Card Bases and how to make them

Details of the products used for my card are as follows.  Please note that all products are from Stampin’ Up!

Live in the UK? Then you can purchase items via my online shop. Simply click on the pictures below.

If you prefer to order direct from me (rather than Online), simply drop me an email and I’ll be in touch.

Place an order on or before 31 March, and if your total comes to £45 (before P&P) or more, you can choose one of these for FREE.

If your total comes to £90 or more (before P&P) you can choose one of these for FREE or two of the above.

All Sale-A-Bration items are available on a while stocks last basis so don’t miss out.

Let's Talk - Tools for a basic craft kit

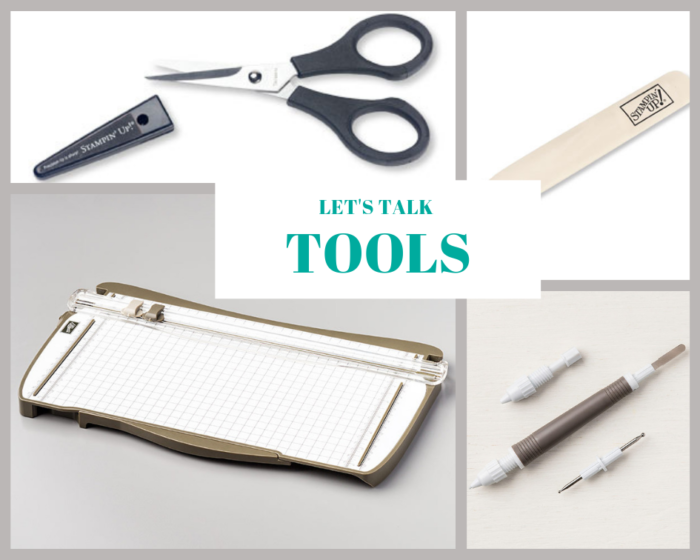
Hello and welcome to Let’s Talk – Tools. This is the fifth in my Let’s Talk Series and I’m concentrating today on the basic must haves in a craft kit.

Let's Talk - Tools. My 5 must haves for your basic craft kit.

What springs into your mind when you say tools? And no I’m not talking spanners, screwdrivers and things. Not even the cute Classic Garage Metal Elements in the Spring/Summer Catalogue.

So, I actually googled the definition of tools and found this

” A tool is a piece of equipment that you hold in your hands to use to do a particular piece of work”.

The term tools actually means different things to different people. So, to me as a crafter it means trimmers, scissors, punches, punch boards, bone folders etc.

My 5 must have basic tools are

Paper Trimmer

Over the years I have used various trimmers with varying success. After a lot of trials and errors, my Stampin’ Up! one has become my trimmer of choice. The reasons being

  • It’s light weight and has a lock on the guard. The lock keeps the guard closed when I’m storing it and furthermore, stops the thin cutting mat from falling out.
  • It has both a cutting and scoring blade and there is no need to remove one when when using the other.
  • As a result of having both an extendable arm and a large cutting base, you can cut full 30.5 x 50.5 cm (12″ x 12″) paper.
  • There are both metric and imperial measurements on the cutting base.
  • Storage compartment underneath for storing your bone folder and additional cutting blades.
  • Blades are easy to replace and replacements come in packs of two. No one likes fluffy edges on their paper and how often you have to change blades is very dependent on the types of paper you tend to use. Cutting lots of paper such as glimmer paper will require you to replace blades more frequently.

Paper Snips

These are a must have for any paper crafter. They are great for getting into the small spaces on images when “fussy” cutting, trimming fluffy edges and cutting off excess paper. Admittedly I also use mine for ribbon and when I can’t find my Take Your Pick Tool, the sharp tip is great for getting under those small embellishments such as rhinestones.

Bone Folder

Used for scoring and making crisp folds in paper and cardstock. Furthermore, it can also be used for distressing and curling paper.

Clear Acrylic Blocks

These are a must have for mounting and using your photopolymer, clear mount and click mount stamps. These are another item that I have accumulated many of over the years. Blocks are a very personal thing – some people prefer thin ones and others thicker. Having tried all sorts, my blocks of choice are the Stampin’ Up! ones. The reasons being –

  • They have a thicker ergonomic design with a groove around the sides. Because of the groove, gripping each block is much easier.
  • There are different sizes available. People think one size fits all when it comes to blocks but when stamping this really is not the case. The block needs be large enough to fit the stamp but not so large that it swamps the stamp. This is because lots of open space around the stamp can lead to ink transfer onto the block and then onto your card stock.

Take Your Pick Tool

This four in one tool is a must have for crafters. It’s designed to make working with small embellishments so much easier. The “putty” end is perfect for picking up sequins and placing them perfectly on your projects. The flat, spatula is designed to easily slip under adhesive backed elements such as rhinestones, pearls and enamel dots. There is also a paper piercing tool AND two sizes of stylus tips

I hope you have found this Let’s Talk – Tools post useful.

The previous topics are (click on each topic to jump to the post) –

  1. Let’s Talk – Stamps
  2. Let’s Talk – Ink
  3. Let’s Talk – Paper
  4. Let’s Talk – Adhesives

Furthermore, there is an accompanying printable sheet for each post. You will find these in the Tutorial Section. See the link in right-hand side bar.

Happy stamping.

Fiona xx

Ways to shop and save in February

2019 Sale-A-Bration  – There are lots of ways to earn free things. Join, Shop or Host the choice is yours. See below for all the latest items available for free with a qualifying spend.

Join my Team – Choose your own starter kit. During Sale-A-Bration you get to choose £170 worth of product for £99 (includes P&P) or add the Craft & Carry Tote (worth £47) and pay £125. What’s more, future orders (min of 3 months) will receive a 20% discount. This is a great way to start your own Stampin’ Up! business or simply make your crafting funds go further.  If you would like more information please contact me at fiona@oakfieldcrafts.com.

Save 10% on Bundles from the catalogues. There is something for everyone simply because there are an amazing number to choose from.

Clearance Rack

Sale-A-Bration 2019 Items

Free with a £45 spend

Free with a £90 spend

Let's Talk - Adhesives

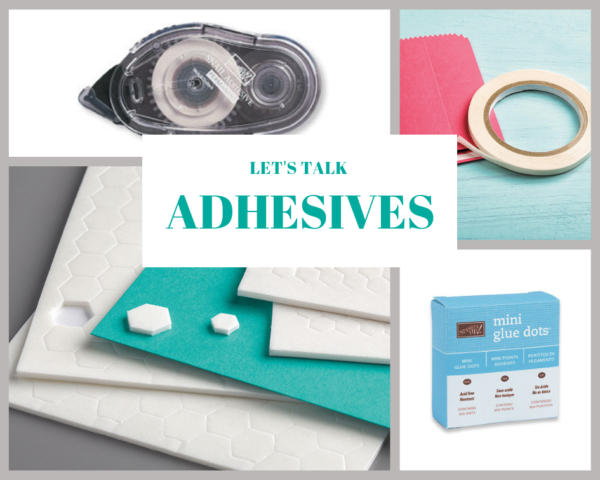
Hello and welcome to the fourth in the Let’s Talk series. Today it’s the turn of Let’s Talk – Adhesives.

Let's Talk - Adhesives there's so many to choose from

To-date I’ve covered Stamps, Ink and Paper but Adhesives are also a vital part of a crafters kit.  The problem is that there are so many different sorts out there that the question arises as to what do you use with what?

So, Let’s Talk – Adhesives

Multipurpose Glue – My favourite sort to use because it is more forgiving. When you glue a layer onto another you usually have enough time to “wiggle” things around before the glue dries. You do not need to cover the item that you are adhering – a thin bead of glue all the way around and a squiggle in the middle is all you need. The glue dries clear too which is a plus point.

Fine Tip Glue Pen – this is a clear glue that has a very thin precision tip. You can apply glue to the thinest of pieces without making a mess. Great for small embellishments such as sequins. It can also be used to add a glossy shine to small stamped and die cut embellishments.

Tear & Tape and SNAIL (which stands for Simple, Neat, Accurate and Inline) – Both of these are double sided permanent forms of adhesive. Once you have adhered layers together they are not going to come apart without a fight. The paper usually looses and rips so you have been warned! SNAIL is refillable so there is no need to purchase a new dispenser when it runs out. A tip for getting things apart if you really need to – use some dental floss between the layers and slowly pull it through them.

Foam Pads and Strips – Come in various sizes and shapes and are great to adhere layers together where you want to add depth to a project. The strips are great if you are looking to make a shaker card.

Glue Dots – Glue dots are my go to adhesive for ribbon and small embellishments.

Adhesive Sheets – double sided sheets used for adhering small intricate die cuts. Adhere a portion of the sheet to the back of the card stock and then die cut out.

Here are all the Stampin’ Up! adhesives currently available.

Hopefully you have found this Let’s Talk – Adhesives useful. You can find the Let’s Talk- Adhesives printable HERE or by visiting my Tutorials Page (link found in the right-hand side bar). The printable has a table showing what type of adhesive to use for what sort of project too.

Any questions? Please let me know by leaving a comment and I will do my best to answer them.

Happy stamping.

Fiona xx

Ways to shop and save in February

2019 Sale-A-Bration  – lots of ways to earn free things. Join, Shop or Host the choice is yours. There are new Sale-A-Bration items coming 15 February.

Join my Team – Choose your own starter kit. During Sale-A-Bration you get to choose £170 worth of product for £99 (includes P&P) or add the Craft & Carry tote (worth £47) and pay £125. You then receive a 20% discount on future orders/purchases (for at least 3 months). This is a great way to start your own Stampin’ Up! business or simply make your crafting funds go further.  If you would like more information please contact me at fiona@oakfieldcrafts.com.

Save 10% on Bundles from the catalogues. There is something for everyone simply because there are an amazing number to choose from.

Clearance Rack

Let's Talk - Paper

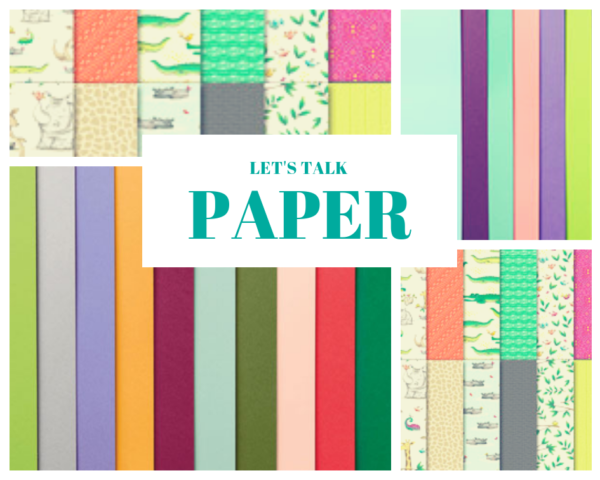
Let’s Talk – Paper is the third in a series of posts that aim to provide basic information that all crafters will find helpful.

let's talk series this time paper and card stock

The previous topics are (click on each topic to jump to the post) –

There is an accompanying printable sheet for each post. And, you will find these in the Tutorial Section (link in right-hand side bar).

Stamps and ink are somewhat useless unless you have a medium to stamp the image onto. There are lots of options but today I want to concentrate on paper (card stock, double sided, watercolour etc).

Here in the UK

  • Card stock typically comes as either 12″ x 12 ” (30.5 x 30.5 cm ) or A4  which measures 21.0 x 29.7 cm (8-1/4″ x 11-11/16″). There are other sizes but these are the two used for card making and most papercrafts.
  • Designer Series Paper (double sided paper) typically comes as either  or 12″ x 12″ (30.5 x 30.5 cm ) or 6″ x 6″ (15.25 x 15.25 cm).

As well as sizes, card stock and paper also come in different weights measured in grams per metre (gsm) or lbs. The higher the gsm or lbs, the thicker the card stock  (or paper) is.

I am often asked what weight the Stampin’ Up! card stock is. This is because people like to use different weight paper and card stock for different things. Here’s a summary of the different card stock and paper that Stampin’ Up! offer along with details of their suggested use.

[table id=2 /]

If you are a scrapbooker then you will be pleased to know that all Stampin’ Up! paper and card stock (except for Glossy White paper) is acid free and lignin free.

There are other paper and card stock products in the catalogues but I’ve not provided details of their weight above simply because they each have a specific use and knowing the weight is not such an issue. I have however included some information about them on the printable version, for the sake of completeness.

But, here’s what I really love about the Stampin’ Up! card stock and paper

  • The coloured card stock coordinates exactly with all the coloured inks.
  • Each paper pack in the annual catalogue has a coordinating pack of card stock. That way you can get a selection of the different colours in the one pack.
  • Card stock can be bought as a pack of just one colour or a pack of each of the colours in a particular colour family. There is something to suit all levels of crafter.
  • The dye colour goes right through the card stock so when you cut into it there are no different coloured edges.
  • Coloured card stock along with the Thick Whisper White and Thick Very Vanilla come in a pack of 24 sheets. Standard Whisper White and Very Vanilla come in packs of 40 sheets. Let’s face it you always need white card stock so being able to get a larger number in the pack is great.

Hopefully you have found this Let’s Talk – Paper useful. You can find the Let’s Talk- Paper printable HERE or by visiting my Tutorials Page (link found in the right-hand side bar).

Any questions? Please let me know by leaving a comment and I will do my best to answer them.

Happy stamping.

Fiona xx

Ways to shop and save in January

2019 Sale-A-Bration  – lots of ways to earn free things. Join, Shop or Host the choice is yours.

Join my Team – Choose your own starter kit. During Sale-A-Bration you get to choose £170 worth of product for £99 (includes P&P) or add the Craft & Carry tote (worth £47) and pay £125. You then receive a 20% discount on future orders/purchases (for at least 3 months). This is a great way to start your own Stampin’ Up! business or simply make your crafting funds go further.  If you would like more information please contact me at fiona@oakfieldcrafts.com.

Save 10% on Bundles from the catalogues. There is something for everyone simply because there are an amazing number to choose from.

Clearance Rack


Let's Talk - Ink

Welcome to the second post in my Let’s Talk Series. This series of posts aims to provide you with useful information to help you on your stamping journey. This week it’s all about Let’s Talk – Ink.

let's talk - ink

Last week we talked about stamps and if you haven’t had a chance to read the information you can find it HERE.

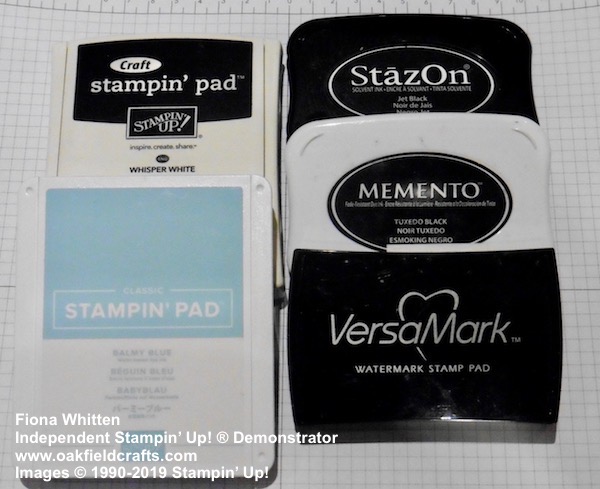
Stamps on their own are a little useless without some way of transferring the image from the stamp onto the paper or other chosen medium. The most common method is to use ink. But, did you know that there are different types of ink?

Types of Ink

  1. Water-based Dye Ink – the most common type of ink used for stamping. It’s acid free and dries quickly. It can also be used for water-colouring. The ink is easy to remove from stamps (and fingers) although it will stain wooden blocks.
  2. Craft (sometimes called Pigment) Ink – this is a slow drying ink and used mainly for embossing. This type of ink can be difficult to remove from stamps.
  3. Solvent based Ink – waterproof and fast drying. Designed to be used on non-porous surfaces such as acetate.  Can also be used on paper – typically when water-colouring. It is difficult to remove from stamps and you will need special cleaning fluid. Please note that this cleaning fluid will ruin photopolymer stamps.
  4. Alcohol based Ink – medium to fast drying. Most come in either a bottle or a marker pen. The pens are used for colouring and are particularly great for colouring large images where you want a no streak finish or want to blend colours into each other.

The type of ink you should use depends on

  • what you are stamping on
  • and what technique (if any) you are going to use.

The whole thing can be a little confusing but luckily I have a Let’s Talk – Ink crib sheet for you. You can print off and keep it for future reference. You will find it by clicking HERE or visiting my Tutorials Page (see image in the right-hand side bar).

Happy stamping.

Fiona xx

Ways to shop and save in January

2019 Sale-A-Bration  – lots of ways to earn free things. Join, Shop or Host the choice is yours.

Join my Team – Choose your own starter kit. During Sale-A-Bration you get to choose £170 worth of product for £99 (includes P&P) or add the Craft & Carry tote (worth £47) and pay £125. You then receive a 20% discount on future orders/purchases (for at least 3 months). This is a great way to start your own Stampin’ Up! business or simply make your crafting funds go further.  If you would like more information please contact me at fiona@oakfieldcrafts.com.

Save 10% on Bundles from the catalogues. There is something for everyone simply because there are an amazing number to choose from.

Clearance Rack

Let's Talk - Stamps

I have decided to start a series of Let’s Talk posts  to share my thoughts  (including hints and tips) on stamping and Stampin’ Up! We are all guilty of assuming everyone knows what stamping is all about. But, this is not always the case and therefore, my idea is to go back to the basics and build on that. I know that some of you have been crafting for some time but hopefully you will find some useful information in these weekly posts.

A video to accompany each post would be ideal, but I’ve decided not to go this route for the time being. The internet service is useless where I live. We are classed as being in the countryside despite living on a major A road and within 2 miles of Wokingham town centre. No one wants to provide a decent service and the net result is that our internet can take 6 hours to upload a 5 minute video. But enough of that.

Today I thought I’d talk about stamps.

Let's Talk Stamps

Stamps are one of the core elements when it comes to card making and paper crafts. Combined with ink, they allow you to add an image or sentiment of your choice either on the front or inside of a card. They can even be used on envelopes. Stamps can be used to communicate your feelings and of course there are so many different images that there is something to suit everyone’s taste. Be it cute, traditional or the more abstract.

Until recently, there have been three types of stamps offered by Stampin’ Up!

  • Wood mount stamps are rubber stamps that either come pre-mounted on wood blocks or they come together in the same box and you simply mount them on the blocks yourself. Because everything comes in one box there is no need to have acrylic blocks. The stamps do however take up more storage space and are much heavier to carry around. You will find this type of stamp in the 2018-2019 Annual Catalogue.
  • Clear mount stamps are rubber stamps that come with stickers that you can put on the back of the stamp (or not as the case may be). You will need a selection of clear acrylic blocks to mount them on. Having said that, these stamps are re-positional which means you can remove them from an acrylic block when not using them. They are much lighter to carry around and are easier to store.  You will find this type of stamp in the 2018-2019 Annual Catalogue.
  • Photopolymer stamps are made from clear photoploymer. Like clear mount stamps they are used with acrylic blocks and are easily peeled off and stored. Because these stamps are clear it is easier to see where you are going to stamp making lining up much easier. You will find over time that your photopolymer stamps will stain. This does not affect the quality of the image. You will find this type of stamp in the 2018-2019 Annual Catalogue and in the 2019 Spring/Summer Catalogue.

In the last 7 months Stampin’ Up! have introduced two new types of stamps.

  • Distinktive stamps were originally made as red rubber stamps (clear or wood mount) but now you will find them in photopolymer too.  The Distinktive stamps are designed to create different opacities on a single stamped image. This gives the image depth and intensity. Each stamp  is no bigger than an ink pad. They work best when inked up using the centre of the ink pad. Alternatively use a Sponge Dauber to apply the ink. The stamps are clearly marked in the catalogues. You will find them in the 2018-2019 Annual Catalogue, 2019 Spring/Summer Catalogue and the 2019 Sale-A-Bration catalogue.
  • Cling stamps were introduced in the 2019 Spring/Summer catalogue and will over time be replacing both wood mount and clear mount stamps. They are made using the same high quality red rubber as wood mount and clear mount stamps. This means your stamping experience will not change. These new stamps, however, come with an adhesive label that clings like mad to your clear acrylic block. You will find this type of stamp in the 2019 Spring/Summer Catalogue and the 2019 Sale-A-Bration catalogue.

From 3 June 2019, when the 2019-2020 Annual Catalogue goes live, new stamps will only be available as 

  • Cling
  • Photopolymer, and
  • Distinktive

As an aide, I have produced a handout giving the info above plus some other tips. Print and download a copy by clicking here. You will also find a copy in the Tutorial Section of this blog.

To find out more on how to add the stickers, and also how to mount and remove the new Cling Stamps from the blocks,  click here.

Happy stamping.

Fiona xx

Ways to shop and save in January

2019 Sale-A-Bration  – lots of ways to earn free things. Join, Shop or Host the choice is yours.

Join my Team – Choose your own starter kit. During Sale-A-Bration you get to choose £170 worth of product for £99 (includes P&P) or add the Craft & Carry tote (worth £47) and pay £125. You then receive a 20% discount on future orders/purchases (for at least 3 months). This is a great way to start your own Stampin’ Up! business or simply make your crafting funds go further.  If you would like more information please contact me at fiona@oakfieldcrafts.com.

Save 10% on Bundles from the catalogues. There is something for everyone simply because there are an amazing number to choose from.

Clearance Rack