Pages

Showing posts with label #Worldcardmakingday. Show all posts

Global Stampers October Blog Hop - Exciting News to Share


Welcome to October's Blog Hop. You have either started here, hopped forward from Ann's fabulous project featuring the Whole Lot of Lovely Designer Series Paper (at least that was the original plan) or back from Robbie who has featured the cute Pick a Pattern Designer Series Paper.

If you are just starting here then you probably haven't seen the news (unless you subscribe to my newsletter) about October's Stampin' Up! specials. More information about these can be found at the bottom of this post.

Global Stampers October Blog Hop - Exciting News to Share

Welcome to October’s Blog Hop. You have either started here, hopped forward from Ann’s fabulous project featuring the Whole Lot of Lovely Designer Series Paper (at least that was the original plan) or back from Robbie who has featured the cute Pick a Pattern Designer Series Paper.

If you are just starting here then you probably haven’t seen the news (unless you subscribe to my newsletter) about October’s Stampin’ Up! specials. More information about these can be found at the bottom of this post.

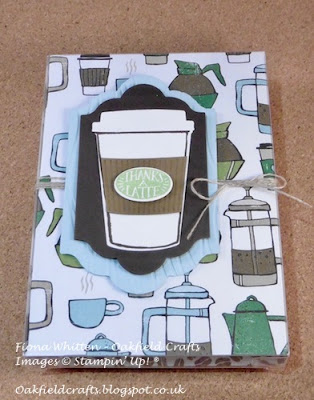
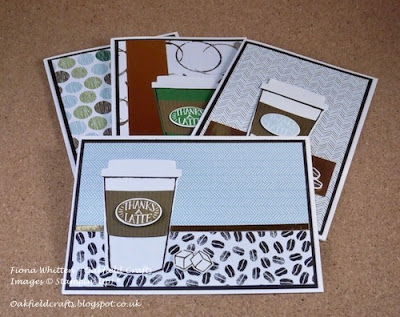
This month we decided to go with a theme, for Men, and to try to include something metallic in our projects. In addition to this, each of us also picked one of the Designer Series Paper (DSP) packs in this month’s sale to feature too.  I opted to go with the Coffee Break DSP  and these are the projects that I’ve designed.

This box is really cute and can be used as packaging for small gifts or even cards. I used the same basic instructions as a previous box and the cutting/scoring information for the paper can be found in my tutorials.
Men do on occasions send a card (at least my hubby does) and they too have a need for Thank You cards. With this in mind, I made a few cards that I’m sure any man would like to receive or even give.

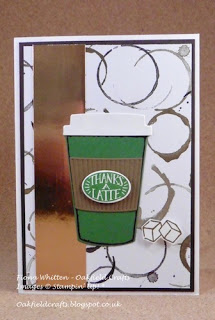
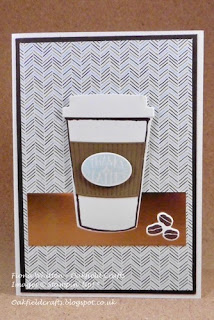
Here’s a couple of the cards in more detail.


I’ve fallen in love with this paper. There is something for everyone one because one side of each sheet has a coffee theme but the other side has contemporary patterns that use the colours Early Espresso, Garden Green, Pear Pizzazz, Soft Sky and Soft Suede.

The co-ordinating stamp set is really cute too. Guess what, it’s in the World Card Making Day Essentials Sale. I guess I’d better let you in on this month’s promotions.

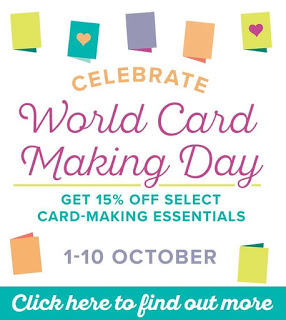
  • It’s World Card Making Day on 7 October, and to celebrate this Stampin’ Up! are offering 15% off a selection of products. You can find the details by clicking on the photo below
  • As if things couldn’t get better, there is also a  Designer Series Paper Sale running for the whole of the month.
Don’t forget there is also the Merry Patterns Hostess Offer from last month because it’s an offer available over last month and this.
I’ve tried to keep things short and brief, but wow, that’s a lot to take in. Don’t forget to hop over to Robbie’s blog and check out her project and then you can continue your hop around. 
You can hop to Robbie’s blog by clicking on the following.
If you would like to hop in reverse or simply go back to Ann’s blog you can click on the following.
A complete list of those taking part is as follows:

Alicia
Ann
Fiona – YOU ARE HERE
Robbie
Valérie

If you don’t get a chance to hop around us all in one day, bookmark this page and then you can click on any of the above and pop over there.

Fiona xx

When is a pop up card not a pop up card?

 When it's a Christmas decoration of course!


For World Card Making Day (1 October),  I had 9 ladies over and I introduced them to the art of making pop up cards. As well as talking them through it step by step, everyone got to make a proto-type for future reference and of course the actual card.

When I was designing the card, I liked the idea of putting a belly band around it to keep it closed. I then have a brain wave to take it one stage further and use the belly band as a way of hanging the card.


The idea is to put some Stampin' Dimensionals on the inside upper panel rather than another snowman or penguin. When sending the card I will include some instructions on what to do. Namely peel the backing off the Dimensionals and then slide the belly band over (without it touching the dimensionals) until it's in a place they are happy with.

This is what it looks like hanging up.


The photo does not really do it justice, it's most definitely cuter in real life.

I love the This Christmas Specialty Designer Series Paper - you get 24 lightweight sheets (4 each of 6 double sided paper) for £11.75. Having 4 sheets of the same paper is great if you want to make lots of the same card or project.

I will be adding a tutorial later this month on how to make these cards, and I'll let you know once I've done it.

Fiona xx

If you'd like to know what I used to make the card, details are as follows:


World Card Making Day - Stampin' Up! Blog Hop


Hello and welcome. Today (Friday night here in the UK)  I'm taking part in a World Card Making Day Blog Hop featuring current Stampin' Up! products. This is such a great way to celebrate this event with lots of amazing inspiration for you to check out.

You are currently visiting me, Fiona Whitten, here in Wokingham (Berkshire, UK). You will get to visit lots of different places around the world as you hop around.

There is a list at the end of this post which will help you to move along from blog to blog, and you will get to see well over 20 amazing projects.

My projects feature the Presents & Pinecones Designer Series Paper and the Suite Seasons stamp set. I wanted to show how easy it is to get three different looks to a card, but use the same paper and stamp set.

For the first card I simply stamped the sentiment in Cherry Cobbler ink and added a cute Cherry Cobbler heart from a pack of the Regals Enamel Shapes. Both the sentiment and the Emerald Envy layers were die cut using the Lots of Labels Framelits Dies.


For the second card, I broke out my Emerald Envy and Cherry Cobbler Stampin' Write Markers, and coloured the stamp using those. I love how you can use the markers to highlight different parts of a sentiment. All the other elements are the same as the first card.


There's a bit of gold embossing on the third card.   The Cherry Cobbler enamel heart was swapped out for a Cherry Cobbler bow that had been stamped and punched out using the Holly Berry Bundle (Holly Berry Happiness stamp set and coordinating Holly Berry Builder Punch). In the centre of the bow there is a round enamel shape from the same pack as the hearts previously used.


All three cards have a stamped image on the inside. I used the same markers as those used on the second card, and simply inked up part of another sentiment from the same stamp set.

Thanks for visiting my blog today, there are so many amazing ideas and inspiration you really don't want to miss. Remember that currently you are at my blog - Fiona Whitten, so check the blog hop line up list below to see who is next on the list.

Blog Hop List 

As always, please feel free to leave a comment. I'd love to know which of the three cards you prefer.

Fiona xx

By the way, there are two fabulous Stampin' Up! offers starting on 1 October.
  • To celebrate World Card Making Day, Stampin' Up! are offering up to 25% off selected card making basics. This offer only lasts until 5 October so don't miss out. Click here to kind out more information.
  • Buy 3 get 1 for Free - buy three packs of Designer Series Paper from a selection of paper packs and choose a fourth for free. Click here for more information.

If you are interested in making any of my cards, you can find details of the products I used below.

Please note, I used the clear mount version of the stamp set (as shown) but it is also available in wood mount too.



Happy World Card Making Day

Did you know that today is World Card Making Day? I know it's not a day normally found in diaries. If you did know, I hope you managed to get a little crafting done.

I spent the afternoon in my craft studio with five lovely crafters, helping them make a project that I had designed specifically for today. I wanted to do something a little different using the Hearth & Home Thinlits Dies and the Happy Scenes stamp set. I'd seen a card on Google that had been made by Julie Davidson way back in 2012, and thought I could adapt. And so I came up with a project that I thought fitted the bill.

This is what I designed for everyone to make.


I admit that I broke this year's New Year Resolution because I did in fact use two stamp sets on this project. The baubles from the Peaceful Pines stamp set were just too cute not to use on the garland over the window.

The card was a huge success with everyone.  It has a number of different techniques on it. The background for the scenes were coloured using Blender Pens for the trees and birds, and the sky using an Aqua Pen. There was of course a little bling in the form of the Red Glimmer Paper stars, and there is also Dazzling Diamond Glitter on the trees and snow (it doesn't show on the photo).

The great thing about this card is that it folds flat into a 5" x 5" square and of course we then just had to make an envelope for it. Once the envelope was made we then just had to then decorate it.  Never ending fun.

This is my envelope.


The flower was made using the Festive Flower Builder Punch. I have a confession to make because the stems were hand drawn using Real Red and Old Olive Stampin' Write Markers because I don't have the co-ordinating Reason for the Season stamp set.

There is a great Stampin' Up! video on YouTube showing how to make the flowers, and you can check it out here.


I have already written a tutorial on how to make my card and everyone who came received a printed copy. The tutorial has also been uploaded to my Tutorial page if you are interested in giving it a go.

Don't have the Hearth & Home Framelits or the Festive Flower Builder Punch, but would like them? You can shop online in my store 24/7.  What's more, this month I am running my BOGOF offer so you can get some free stuff through that and the chance to earn more if you use the Hostess Code that it at the top left of this blog.

Details of the Stampin' Up! goodies used for this project are as follows:

Built for Free Using: My Stampin Blog


PS I used Fringe Scissors to make the fringe on the rug. Forgot to add it to the list, oops. 

Woop Woop

I'm not sure if any of you have noticed the new label in the left-hand side? The card that I featured in my post on 27 September that I made for the Connie and Mary Challenge made the Top 3 Pick.

Yesterday was World Card Making Day and I held a Christmas Stamp-a-Stack class here at home.

I designed four cards and everyone made four of each, so they ended up going home with 16 cards with co-ordinating envelopes.

I promised to post photos of the cards that everyone got to make so here goes.

Card 1 - Endless Wishes using Smoky Slate and Lost Lagoon card stock with Smoky Slate, Lost Lagoon and Pool Party ink


The inside of the card was decorated with a snowflake in Smoky Slate and also some All is Calm Washi Tape.


Card 2 - Festival of Trees stamp set using Lost Lagoon and Smoky Slate card stock and then Pear Pizzazz and Lost Lagoon ink. The window in the Smoky Slate card stock was made using the Starburst Framelits and then the card was embossed using the Lucky Stars embossing folder.


The inside of the card was finished off using the All is Calm Washi Tape as was the envelope for the card.


Card 3 - Get Your Santa On stamp set with Early Espresso, Cherry Cobbler and Old Olive card stock. The Santa image was stamped using Memento Ink and then coloured using Cherry Cobbler and Skin Tone Blendabilites.


We used the Window Frames dies to cut the image and mat and then finished off with a little paper piercing using the Festive Paper Piercing Pack. The Cherry Cobbler card stock was embossed using the Chevron Embossing Folder and a piece of Early Espresso Baker's Twine was wrapped around it and finished in a bow.

Card 4 - Cheerful Christmas stamp set with Old Olive and Cherry Cobbler card stock. The image was inked using Early Espresso, Cherry Cobbler and Old Olive Stampin' Write Markers.


The baubles on the card front were stamped in Old Olive before the Cherry Cobbler mat was added. You can't see it too well from the photo but there is also some Dazzling Diamonds on the pine fronds.

I'm pleased to report that everyone managed to complete all 16 of their cards but I think that it partly down to the fact that I had pre-cut all the card stock. Yep, I cut the card for 192 cards, I must be mad!