Pages

Showing posts with label Glimmer Paper. Show all posts

Happy Birthday Mum

This time of year is pretty manic in my house. Not only do I have all the preparation for Christmas but two birthdays to shop and make for too.

My Mother's birthday is 24 December (Christmas Eve) and we usually celebrate with a chinese takeaway. This is very much a family tradition going back to when I was little. This year was no exception and in the end, there were 10 of us crammed round my kitchen table because I'd already set up the dining table for Christmas lunch.

I used some of my sneak peek products from the 2016 spring/Summer Catalogue to make Mum's birthday card.


I used Crumb Cake and Blushing Bride ink and cardstock.  The heart is cut from Blushing Bride Glimmer Paper using one of the Bloomin' Heart Thinlits Dies.

I also used my Precision Plate and the new Big Shot Die Brush. I have to admit that I didn't rush to purchase the plate but now that I have, I love it. A few things you need to know about it though (i) only use it with full intricate dies (do not use with framelits), (ii) you may need to run it through the Big Shot twice, (iii) place your die closer to the side of the plate and not the middle and (iv) don't place the die constantly in the same place.

The banner and flowers on the inside of the card and on the envelope come from the co-ordinating Bloomin' Love stamp set.


The scallop square is the largest square from the Squares Collection Framelits. I thought that the scallops sets the heart off nicely. A bit prettier than a plain square.

Details of the products that I can give you details for are as follows:


Copies of the 2016 Spring/Summer Catalogue are going in the post on Tuesday to customers and class attendees. If you don't already have a UK Stampin' Up! Demonstrator and would like to receive a free copy of the catalogue please email me with your details.

Quick share with you this morning

Thought I'd quickly share one of the Wedding Invitation samples that I made for a good friends daughter.


My brief was something vintage/shabby chic/rustic. This one is slightly off from the brief (not rustic enough for my liking) but I think it would make it a great card for any special event - simply change the sentiment/greeting. 

I've used the Hearts a Flutter stamp set along with the matching framelits. The "you're invited" comes from the A Dozen Thoughts stamp set. I'm sad to say that the Hearts a Flutter stamp set is on the Retirement List but pleased that the framelits will still be around come 1 July.


The Crochet Trim is also on the retirement list along with quite a few other ribbons, so check out the list before it all goes.

Make & Take Challenge

Yesterday I shared the cards from the Secret Santa Swap from Saturday's Christmas Party. It's not a Stampin' Up! party without a game and a Make & Take. I did in fact prepare two make & takes. The first was a really quick one which involved making a desk calender but the second was a little different.

Here's my desk calender.


Stampin' Up! supplies used:

Card stock : Crumb Cake and Crushed Curry
Designer Series Paper : Sweater Weather
Accessories : Stampin' Trimmer or Simply Scored Scoring Tool, Boho Blossoms Punch, Basic Rhinestone.

As I said, the second Make & Take was a little different because I simply provided a package of cut card stock and designer series paper and a box containing three ink pads and two sets of stamps (plus a couple of other things to throw them off the scent). Everyone then had free reign to make a card and there were raffle tickets to be won depending on how close their design was to mine. I had pre-made a card and put it in a brown envelope. I'd even put cardboard around the card so that if they felt it it would not give anything away (a little extreme I guess). We opened the envelope when everyone had finished.

Here's my card and one of the packs that I gave everyone.


And, here's what everyone came up with.


Bottom one is mine


It was lovely to see how different they all were, and yet there's one or two quite close to the mark.  If you are wondering how it worked, there were points awarded if the card was the same orientation (landscape), had a V cut into the banner, used Cherry Cobbler for the greeting, used the same greeting, used one or more of the splatter stamps from Gorgeous Grunge, etc. I think you get the idea.

I think this Make & Take was enjoyed by everyone and I for one certainly loved seeing all the different designs that were made from three pieces of card stock and three strips of Designer Series Paper/Glimmer Paper.

Stampin' Up Supplies Used:

Stamp Sets : Gorgeous Grunge and Joy to the World
Card Stock : Soft Suede, Cherry Cobbler and Whisper White. Champagne Glimmer Paper.
Ink : Soft Suede, Cherry Cobbler and Old Olive
Designer Series Paper : Season of Style
Accessories : Paper Snips and Dimensionals

I have a piece of exciting news to share with you today. A new Clearance Rack Blitz starts tomorrow (10 Dec). There will be retired products, with some of them up to 80% off their original prices.

You can order on-line and have them shipped direct to you for £4.95. Alternatively, if you live close to me and are willing to risk them still being available this coming weekend (when I put my next order in) I can add them to my order and you can come pick them up. In this instance, shipping would be free. The choice is yours but don't miss out by leaving it too late. I am sure that there will be some great bargains to be had that would make great Christmas presents.

Recycled Peg Wreath

Earlier this year (1 April)  I shared a wreath that I had made using some Designer Series Paper and large pegs - Spring Wreath.  Rather than throw it away or hide it in the cupboard until next Spring, I decided to recycle it by simply covering the other side of the pegs to make a new wreath with a Christmas feel.

This is what I made using the Season of Style Washi Tape instead of Designer Series Paper.


It only took me a couple of hours to complete this from start to finish. I recovered the central piece of card with Old Olive card stock and I also printed and then coloured the poinsettia. I don't have the Joyful Christmas stamp set so I downloaded the brush set from My Digital Studio printed it onto Whisper White card stock and then coloured it using Cherry Cobbler ink and a Blender Pen.

I popped the coloured poinsettia up on dimensionals on a scallop circle of Champagne Glimmer Paper. A length of Cherry Cobbler 1" Stitched Grosgrain Ribbon and voila.

But wait, there's more, I said I would share the finished pictures that I was making for my sisters. Here's one of them.  I had to take the glass out of the frame to take the picture, otherwise all you would see is a reflection of me!


I ended up adding Basic Rhinestones of various sizes and printing more snowflakes so that I could cut out part of them and pop them up on dimensionals over the original printed picture. I decide not to cut the snowflake to match the edge of the picture, but left them hanging over the edge to add a little interest. The Island Indigo one was finished in a similar way.  I hope that they will like these.

Off now to finish the preparation for Saturday's Christmas Stamp-a-Stack.  I share photos from that sometime over the weekend.

Table treats

I thought I'd share some of the Christmas table decorations that I've just finished making. I've made 30 in total, not that I have that many people coming to Christmas lunch but because I'll be giving some to my sister Tracey. She's not likely to make it to Christmas Lunch (Jenny's 21st Birthday Lunch) so I've made enough for her family and guests too.

The table decorations contain chocolates and I've used the same template that I used for another project earlier this month (based on the swap from Kim - click here to see previous blog).


Stampin' Up! supplies used:

Stamp set : A Gift for You (Single Christmas Stamp)
Card stock : Old Olive, Cherry Cobbler or Baked Brown Sugar and Whisper White
Designer Series Paper : Season of Style
Ink : Cherry Cobbler
Accessories : Season of Style Washi Tape, Champagne Glimmer Paper, Merry Minis Punch Pack (the Star), Label Bracket Punch and Dimensionals

I will be sharing how to make these at my November  classes ( 15th and 16th November) together with some other gift ideas. The theme of the class being Christmas Gifts and Packaging. I have some spaces left, so if you are interested in coming along drop me a line.

A Quick Thank You

A really quick post this morning. I still have lots to do before we head out tomorrow morning. I have a couple of orders to deliver this morning, an order to place to ensure that it's here when I arrive home (supplies for the Make and Take for the Bracknell Show) and a thousand and one other things to do.

One of the swaps that I received from Training was a Thank You card made by Emma C.  I like to send customers a Thank You card when I deliver their order, or I try to post one to them if they have asked that their order be sent direct to them. I don't usually sign the card so that the customer can re-use the card. I thought that Emma's swap would be a great card to CASE and use for this month's order. 

I always seem to find myself not having the exact same stamp set, so my card is not quite the same as the original. I also wanted to simplify things as I had quite a few to make and the stamp that I used did not lend itself to some of the additional elements that Emma had added.

Anyway, here's my card that has been going in with May's orders.


Here's my card

This is the original by Emma C
Stampin' Up Supplies used for my card

Stamp set : Wacky Wishes (Hostess set)
Card Stock : Crumb Cake
Designer Series Paper : Epic Day This and That
Accessories : Silver Glimmer Paper, Epic Day This and That Washi Tape

For once the camera has caught the fact that there is glimmer paper on the card!

Check back tomorrow to see what's going on. I will have a little game for you to play which involves guessing where I am.  There will be full details tomorrow of what you need to do to receive a small gift from me.

Larger then normal

It's not often that I make a card that is bigger than A6 in size but I was asked if I could make a large one for a customer to send to her family. She had already bought a couple of cards at the Wokingham NCT Craft Fair and loved the gingerbread man, tree and candy cane from the Scentsational Season stamp set.


This card is made from a whole A5 sheet of card stock so it's double the size that I usually make. Even so, it is still difficult not to put too much on it.

I decided to decorate the inside of the card too, but kept it simple by stamping just the one tree with a gold star on top.


Stampin' Up! supplies used:

Stamp sets : Scentsational Season and Greetings of the Season
Card stock : Crumb Cake, Real Red and Very Vanilla. Champagne Glimmer paper
Ink : Real Red, Gumball Green and Soft Suede
Accessories : Apothecary Accents Framelit dies, Scentsational Season Framelit dies, Merry Mini Punch Pack, and Gold Stampin' Dazzle Marker
Misc : Linen Thread and Dimensionals

You may have noticed, but only the candy canes are fixed with dimensionals. I threaded the other images onto the LinenThread but they are left hanging as I found that this gave the thread a more natural "washing line" look.

I would like to say that all my Christmas card making is over but this is not the case. All the ones that had to go in the post have now gone but I still have family to make for including two birthdays. So, check back over the next week to see a few more projects.

Sweet Treats

Despite finishing the last craft fair last week, I am still in a Christmas craft mode. I thought I had made enough Christmas cards for friends and family but find I am 20 short so I know one thing that I will be doing sometime this weekend.

Christmas in my book is a time for family but things never seem to work out that way. This year will be the first time in three years that we will be here in the UK. Last year we chose to go to the States and the year before we were stuck in the States because of all the ice on the runways over here. This year we have plans to spend Christmas Day (also my daughter's 20th birthday) with my Mother and one of my younger sisters, Helen and her family.  My other sister is staying at home with her family as she will have her In Laws visiting.

Because we will be all over the place (but at least in the same country) I decided that I would make some sweet treats that everyone can put on their Christmas table.


So far I have made 18 of these. I choose to fill mine with mint imperials but you can use whatever sweets you prefer. They are really simple to make and will I think, look cute on the table.


Each carton is made from half a sheet of the Festival of Prints Designer Series Paper Stack. This is a cute stack of double sided paper that is 11.4 cm x 16.5 cm (4" x 6.5") in size.


Stampin' Up! products used were:

Stamp Set : Tags til Christmas
Ink : Cherry Cobbler
Card Stock/Paper  Festival of Prints DSP, Very Vanilla, Champagne Glimmer Paper, card board backing from DSP packs (for the snowflake).
Accessories : Snow Flurry Die, Big Shot, Ornament Punch, Star from Merry Minis punch pack, Brayer, 
Misc : Sticky Strip, Dimensionals and Basic Rhinestones

I have a few more of these to make for my In Laws so I am most definitely going to have fit a crafty session in-between today's christmas shopping with the kids, and tomorrow's shopping with the Mother in-law.

Merry Minis Punch Pack

I saw this card on the Stampin' Up! UK blog and also on another one belonging to Nicole Picadura. In both cases they used the Merry Minis stamp set and the matching Merry Minis Punch Pack.

OK, I have to admit that I don't have the stamp set. As much as I would like to have absolutely everything I do have to call a halt at some point. I do however have the Merry Minis Punch Pack and some scrap Be of Good Cheer Designer Series Paper. The net result of this combination is below.


I punched nine trees and six baubles from the DSP and then a star from some scrap Champagne Glimmer Paper that was left over from making the Snowflake seen on the ornament from the previous blog post. This is a super simple card to make. The only fiddly bit is the cutting up of the Dimensionals to stick the punched trees and baubles etc onto the Whisper White card stock.

The greeting from the Greetings of the Season stamp set was stamped in Cherry Cobbler.

As this card was so easy to put together I gave it to the ladies who came to class on Friday as an extra project to make. They finished all of their projects early and this seemed like a cute quick one to give them to make. I hope you enjoy having a go at making your own version.

Second Christmas Ornament

Things did not go to plan yesterday and I ended up spending the day in bed with a tummy bug (too much information/I hear you say). Because of this I had to cancel Saturday mornings class not a decision I took lightly.

My Saturday morning class is a repeat of the evening before, so I can still share one of the projects that we made.


The ornament was made using Naturals Ivory card stock, some scrap Cherry Cobbler card stock (but you can use whatever red you have to hand) and some of the lovely Champagne Glimmer Paper.

I started with a piece of 10 cm x 29 cm Naturals Ivory and scored along the long side at 1 cm intervals (so 29 scores).  I then cut the card stock into two pieces of 5 cm x 29 cm and folded both pieces concertina style. I made up the rosette with the help of my trusty hot glue gun and two 1-3/8" circles punched from some scrap Naturals Ivory. Once the rosette was safely glued together I added a flower punched from Cherry Cobbler card stock using the Blossom punch.

From there on it is quite simple to finish off the ornament. The three layers of the snowflake where cut from Champagne Glimmer paper using the Snow Flurry die and layered together using Dimensionals. I also added a star punched from the Red Glimmer paper using one of the Merry Mini Punches from the Punch Pack.

To hang the ornament I threaded a piece of Very Vanilla Seam Binding Ribbon through a hole at the top of the ornament.

Everyone who used the Simply Scored Scoring Tool thought it was great as it made making the rosette so simple. No more scoring and moving the card stock along and ending up with slightly different widths if you're not too accurate with your placement of the card stock. In fact, it made things so simple that everyone ended up finishing early and I had to think up of another project for them to do to on the spur of the moment. I will share that one with you later in the week.

What's more, I have a feeling that I am going to be making a few more of these over the next couple of weeks as presents for friends and family.

Last Christmas Stamp-a-Stack

As promised here are photos of the cards that everyone made yesterday at the last stamp-a-stack of the year.

So that I can get these posted quickly and to save time I am simply going to list underneath each card the product that we used. I have to add however that there seemed to be two clear favourites. The first and second ones, but I will leave you to decide for yourselves.


Stamp Set : Easy Events
Card Stock : Whisper White, Raspberry Ripple and Old Olive
Ink Pads : Old Olive
Other Products: Perfect Polka Dots embossing folder, Blender pen, Vanilla Shimmer Smooch Spritz, Dimensionals


Stamp Sets : Snow Swirled and Greetings of the Season
Card Stock : Very Vanilla
Ink Pads : Lucky Limeade and Cherry Cobbler
Other Products : Red Glimmer Paper, Cherry Cobbler Dazzling Details, Star from Merry Minis Punch Pack, Dimensionals


Stamp Set : Happy Hour
Card Stock : Whisper White, Real Red, Basic Black
Ink Pad : Gumball Green
Stampin' Markers : Real Red, Basic Black, Gumball Green
Other Products : 1-3/8" Circle Punch, 1-3/4" Scallop Circle Punch, Scallop Trim Punch, Square Lattice Embossing Folder, Gumball Green 3/8" Stitched Satin Ribbon, Sticky Strip, Dimensionals

Please feel free to leave a comment and let me know which one you like the most.

Christmas Craft Fair

Today's post of going to be short as I'm still recovering from the madness of my first Christmas event of 2012. Not so much from the event itself but from all the preparation that goes into doing one.

Thursday evening saw me at the Crowthorne C of E Primary School at their Christmas Shopping Evening. I had a great time talking to some of the ladies who attended the event and I received lots of complimentary comments about the cards and products that I had on show.

The winner of the Prize Draw was Pam Lovell.

Here's a photo of my stand. Check out the snowflakes on the left.


 Below is a close up photo of the snowflakes.


There are pretty easy to make, more so when you have the right equipment. The snowflakes were made using the Snow Flurry Die that is in the Autumn/Winter Catalogue and some white card (I recycled the card that comes in the back of the packs of 12 x 12 patterned paper). The star in the centre is made from some Red Glimmer Paper and the red glittery spots on the tips of the snowflakes are made  using Cherry Cobbler Dazzling Details. I have a sneaking suspicion that some of my class attendees are going to be wanting to make some of these in my December classes.
My next Christmas Event is in Wokingham on 29 November. I will be at the NCT Christmas Shopping Event. If you live in the area and fancy dropping by to say hello, it would be lovely to see you. Details of the event are on my Event & Classes page.

Snowflake Soiree

You may recall that at one of the Christmas Stamp-a-Stack classes we made a card using the Snowflake Soiree stamp set (actually you only saw a sneak peek so I will share them another time), here is another one made using the same stamp set but this time I have added some of the lovely Champagne Glimmer Paper. This glimmer paper is great as it does not shed the glitter - something I am conscious about as I am allergic to the stuff! Yep, fancy being a crafter and being allergic to glitter!

The trouble is the effect is so lovely I just can't not use the paper so I hope you like the card.


The snow flakes were stamped in both Early Espresso and Crumb Cake. 

The greeting which was stamped in Early Espresso too comes the Curly Cute stamp set. 

I matted the stamped greeting directly onto a piece of the Champagne Glimmer paper but offset it from the matt of Early Espresso card stock. To be truthful I only had a scrap of the Early Espresso and it wasn't quite big enough to matt directly over it so I offset it. I like this effect and will be using it again on other cards.

Tomorrow is my husband's birthday. I will be showing you the card that I made him, but I didn't want to post it beforehand because I know that he occasionally takes a look at my blog.

Glitter and Brads

I thought that today I would "kill two birds with one stone" and feature a card that has both brads and glitter on it. Actually I cheated a little as I have used some of the lovely red glimmer paper that is still available in the Spring Mini Catalogue. Please note that you can only order items in the Spring mini up to the end of April 2012 so don't miss out.


I used both the Glimmer Paper and some Basic Black card stock and ran it through my Big Shot using the Fun Flowers die. After crumpling the Basic Black and also bending the Glimmer Paper, I put the flower together and held it with an Antique Brad.

The card base is made from Basic Black card stock, and a piece of Whisper White was run through the Big Shot with the Perfect Polka Dots embossing folder.  The greeting comes from the Teeny Tiny Wishes stamp set and it was punched out using the Word Window punch before being mounted onto a piece of Glimmer Paper that had been punched out using the Modern Label punch.


Because I used Basic Black card stock as the card base, I decided that it would be a good idea to add a stamped piece of Whisper White to the inside of the card, so that whoever sends the card can write a message. I used the Ornate Flowers stamp set and stamped it in Real Red.


It's hard to believe that Sale-a-Bration will be over in a few more days. I hope you have managed to get a hold of one of the FREE sets, but if not there is still time as we can place orders right up to 10.30 pm on 31 March.

I still need to post photos of the projects made at last weekend's Craft Day and will do this asap as we used some Sale-a-Bration products and I will not be able to post new photos of these after 31 March. Old posts will of course remain on here as inspiration and ideas.

Quick and Simple Valentines

I thought long and hard about what valentines day card to give my husband and decided to make him a different one. Not that I don't like any of the ones I've already made, I love them, but he is a no fuss kind of guy. I decided at 10 pm last night that I would make something a little simpler and because of the time it had to be quick!

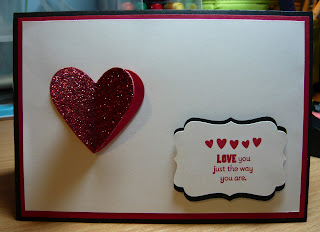
Here is what I came up with, and it's now written and in it's envelope waiting for him to open it.


The base card is made from a piece of Basic Black card stock and a piece of Real Red and Whisper White were matted onto it.

The heart was made using the Heart Punch and some scrap Real Red card stock (I punched two out) and a third heart was punched from the lovely Glimmer Paper (available until April 30 only). I love this stuff as the glitter does not come off and it can easily be punched. All three hearts were folded in half and then glued back to back to make the 3D heart. This was then glued onto the card.

The greeting was made using Real Red ink and one of the messages from the Sprinkled Expressions stamp set. This stamp set is one of those available as part of Sale-a-Bration.  I then punched out the message using the Decorative Label punch and punched a further one from Basic Black card stock. The whole thing was then stuck to the card using Stampin' Dimensionals.


Because the base card is Basic Black I glued a piece of Whisper White card stock inside but not before stamping the hearts from the message on the inside. I inked the stamp using a Real Red Stampin' Marker and that way I was able to ink just the part of the stamp I wanted.

The end result is a quick, simple but effective card which I am sure he will love.