Pages

Showing posts with label Stamp-a-ma-jig. Show all posts

Happy Anniversary

Last Thursday was our 32nd Wedding Anniversary. I spent most of it mid-air as I was flying back to San Diego having spent 5 days helping my daughter move into her apartment for college. George on the other hand spent the day in the UK.

I knew that we would be apart so I made and posted an anniversary card to George. This is what I sent him. It's OK to share as he has received it.


Unfortunately it was not in the same condition when he received it in the post. The postman had left it in the mail box and it had rained heavily that day. The outside is fine but he sent me a photo of the inside which did not fare so well.

Just so you know, the hearts are stamped onto the hexagons that are cut out by the Hexagon Hive die and yes there are supposed to be three joined uncut ones in the middle.  I know a few people, me included, who thought that this was an error when we first got the die, but no, it's supposed to be like that.

I used my Stamp-a-ma-jig to stamp the greeting as I wanted to make sure of it's placement. The three uncut hexagons together make a great place to stamp a greeting.

I'm really pleased at the way the card turned out and I know that George liked it too.

The Hexagon Hive die along with the Honeycomb Hello stamp set that I used can be purchased individually or as a bundle (available in both wood mount and clear mount too). If you purchase the bundle you save a whopping 15%.

Stampin' Up! products used are

Built for Free Using: My Stampin Blog

Team challenge

Firstly, Happy Mother's Day to you all.

I'm sorry to say that this cold doesn't want to go away and as a result, I've not been doing much crafting this week. There has been a lot of tidying up and looking and pinning on Pinterest though.

One of the projects that I did eventually get finished (there were a few samples that I'm too embarrassed to show) was an entry for the Stampin' Stars facebook page challenge.  Cayleigh set the challenge which was to make a one layer card. I know that many people don't like making these because there is nowhere to hide any errors (hence the few I can't show you). The one I entered (there is no prize, just the fun of taking part) is not 100% perfect but I actually like that about it.


This card involves the 2 Step Stamping technique so a Stamp-a-ma-jig is a must. A couple of hints for you. The first is to stamp all of the back ground colours first, and the second to over stamp with the second stamp cleaning the Stamp-a-ma-jig between each different stamp. How do I know this? Well one of my non entries is testament to not doing this because of the smudges from my hand (ink picked up from the plastic sheet). 

I don't often blow my own trumpet but I have to admit that I'm really pleased how this card came out. 

Stampin' Up! supplies used:


Stippled Blossoms Clear-Mount Stamp Set
£18.95
Petite Pairs - Clear-Mount Stamp
£20.95
Stamp-A-Ma-Jig
£10.95
Pool Party Classic Stampin' Pad
£4.95
Island Indigo Classic Stampin' Pad
£4.95
Pear Pizzazz Classic Stampin' Pad
£4.95
Old Olive Classic Stampin' Pad
£4.95
Blushing Bride Classic Stampin' Pad
£4.95
Melon Mambo Classic Stampin' Pad
£4.95
Whisper White A4 Card Stock
£7.50


Dazzlingly Gorgeous

I have been playing with my Gorgeous Grunge stamp set to make some Christmas Cards for friends in the USA. I'm on a pretty tight deadline because George is supposed to be taking them with him to post. He heads out on Friday so I only have a couple more days to get them all finished.

I have so far come up with three different designs - using more traditional colours but they have a more modern feel. I'd be interested to hear what you think of them so please feel free to leave a comment (good or bad). I've only made four of each so I need to come up with a couple more designs if I want to have enough to send.


A little bit of Dazzling Diamonds to added sparkle

More Dazzling Diamonds (same design as previous)

I used my Stamp-A-Ma-Jig to ensure the lines were parallel
A few festive splats of colour

As all of these are heading to the USA, the cards will have this insert
Stampin' Up! supplies used:

Stamp sets : Gorgeous Grunge, Very Merry Tags,  Joy to the World,  Happy Hour and Petite Pairs
Ink: Old Olive, Cherry Cobbler and Soft Suede
Card Stock : Old Olive, Cherry Cobbler and Whisper White
Accessories : Stamp-A-Ma-Jig, Artisan Label and Mosaic Punches, Dazzling Diamonds, Cherry Cobbler Baker's Twine, Basic Rhinestones and Dimensionals

As I said, please feel free to leave a comment.

Check back soon to see what else I've come up with.


Trying out a new Technique

I have been wanting to try out this new technique for a short while. I have no idea what it is called but I have seen a number of projects on blogs.

It is in fact quite simple to do and does not require a huge list of products.


Stampin' Up! supplied used:

Stamp set : Hello, Hello (single stamp)
Card stock : Rich Razzleberry, Old Olive and Crumb Cake
Ink ; Whisper White Craft and Rich Razzleberry
Accessories : Whisper White Organza Ribbon, Stamp-a-ma-jig and Dimensionals.

The effect is achieved by simply stamping using the Whisper White craft ink first, leaving to dry (you can use a heat gun to dry it quickly if you are in a rush) and then over stamping but offset a little using the same image, but in another colour. The white then looks like a shadow of sorts.

We are off out this morning to visit my Mother-in-law, but I'll be back this afternoon to make a start on some more projects to share.

Friday Night Challenges

There were two challenges set last night for those of us who did not go to the European Stampin' Up! Convention at Disneyland Paris.  For some reason (madness I think), I decided to do both of them.

The first challenge set by Rozelle, came in two parts. The first part was to include a repeated stamp image and the second part was to keep the colour theme monochrome. This means that you can only use one colour but in different shades or hues of that colour. White was also allowed, but I deviated a little and used Very Vanilla instead (hope this is ok).

The second challenge was set by Laura and this was to make four or more ATCs using our Stampin' Up' stash.  I've never made ATCs before but luckily Laura posted details of what they are. For those of you who are not sure, an ATC (Artist Trading Card) is a small, original piece of art created with the intention of trading or swapping it with another artist. The main rule is that the ATC should be no more than 2.5"x 3.5" in size.

I decided to combine the challenges and use the same basic idea for both. I opted to use the Ornate Flowers stamp set and to use Rich Razzleberry as my colour. I love anything which has an Art Nouveau feel and the Ornate Flowers stamp set is one of my favourite sets as a result.


I used my Stamp-a-ma-jig to stamp the background, which is Rich Razzelberry on a piece of Rich Razzleberry card stock. I'm glad I opted for a larger stamp for the background, I can be patient but there is a limit to how many times you stamp the same image. The main image and the message are also stamped using Rich Razzelberry but the main image was stamped on a scrap piece of paper and then re-stamped but without re-inking the stamp. It is the second image that was cut out and then matted onto a piece of Rich Razzelberry.  The ribbon is a piece of 1-1/4" Striped Grosgrain Ribbon in Rich Razzleberry (no longer available) that has been bunched up by pulling some of the threads.

The message from the Perfect Punches set was stamped (but the oval was not coloured) and punched out using the Scallop Oval punch and them matted onto a piece of Rich Razzelberry that had been punched out using the Decorative Label punch. I added a small butterfly made using the Beautiful Wings Embosslits Die.


Rather than making four ATCs the same, I decided to make four different ones. Actually, I have to admit that it never occurred to me to make four the same, doh! Will someone please remind me next time not to make things so difficult for myself. I did however, stick to the monochrome theme (Rich Razzelberry) and same stamp set (Ornate Flowers) that I had used for the other Friday challenge, so all was not lost.

Other than the Ornate Flower stamp set, I did use a few different punches.  Namely, the Scallop Circle punch, the Scallop Trim Border punch, the Word Window punch, the Modern Label punch and the Dotted Scallop Ribbon Border punch.

I hope you like my efforts from last night and please check back tomorrow to see what exciting things today's challenges (yes there is more than one) brings.

My first attempt using the Lace Ribbon Border punch


A quick and simple Thank You card this time round. I made this for a friend who was my first customer, as a thank you for her order. This is the first time that I used the punch, in fact I have to admit that I borrowed it to try it out, but I will most definitely be putting it on my next order. Shush, don't tell my husband because the list is getting longer by the day.

The card is a piece of Melon Mambo card stock made into a 3.75" x 3.75" card base. Using the new Lace Ribbon Border punch I punched a piece of Pumpkin Pie card stock. I also punched out three 1" Old Olive circles using my 1" Circle Punch. These were fixed behind the card ribbon and then the whole thing was matted onto a piece of Whisper White card stock.


I used a Melon Mambo marker on the oval stamp from the Perfect Punches stamp set and the message was from the Just Believe set and was inked using an Old Olive marker. I used my ever trusty Stamp-a-ma-jig to make sure the message was central in the oval before punching out the oval using my Extra-Large Oval punch.The message was fixed to the card base using Stampin' Dimensionals.

I love using the Stampin' Write markers, they give stamp sets many additional uses as you can simply ink up the parts you want to stamp and then you don't get the parts you don't want to use. You can also ink up parts of the stamp in different colours to get different effects. I'll post some samples of this later in the week.

If you would like to purchase any of the items that I have used please contact me Fiona

Gift Set

I've mentioned in some of my previous blogs that I am going to be doing some Christmas Craft fairs this year.  I thought I'd share with you some of the things that I have made.

This first one is a gift set which is made up of a covered "sticky notes/pad" with pen and also a bookmark/tag.


I used some Designer Series Paper to make the cover for the sticky pad and also the base for the bookmark/tag. I stamped the background stamp from the Clearly for You stamp set in Pacific Point and matted the stamped image onto a piece of Rich Razzleberry card stock. The message also comes from the Clearly for You set and I stamped this is Rich Razzleberry using my Stamp-a-ma-jig to make sure that is was straight and where I wanted it to be. This was one of those times that I did not want to give the freehand stamping ago!

I think that the set would make a great gift for a teacher or work collegue.

Box of cards

This time of year my thoughts turn to Christmas, and I begin to panic. I am sure that I am not the only one, but having two family birthdays in December (Christmas Eve and Christmas Day) means that not only do I have to sort out Christmas presents but birthdays too.

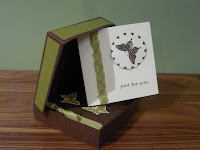
Looking through my stash of goodies and past make and takes I came across the pizza box of cards that I made at a class at Cate's house. These gave me an idea for another box that I could make as a gift for my mother.


The box was made from one piece of Chocolate Chip card stock. The sides and top were decorated with strips of Old Olive card stock and Old Olive and Very Vanilla respectively. The corners of the Very Vanilla were cut off using a small round punch, and the Very Vanilla was stamped in Chocolate Chip using the large stamp from the Bliss stamp set. The message came from the Just Believe set of stamps and punched out using the Modern Label punch

Inside the box there are four square cards with envelopes. 
  • The first was made from Chocolate Chip card stock. The base card was stamped using a Chocolate Chip stampin' pad and the large stamp from the Bliss set. The butterflies were stamped in Old Olive onto Very Vanilla card stock and then cut out. A piece of Old Olive Ribbon was tied and then stuck onto the left hand side of the card.
  • The second card was made from Very Vanilla card stock. A single butterfly was stamped in Chocolate Chip and punched out using the Scallop Circle punch. A piece of Chocolate Chip was also punched out using the scallop circle punch and the butterfly was stuck on top so that the chocolate chip shows between the scallops. A piece of Old Olive ribbon was attached on the left hand side using Sticky Strip.  I used the sticky strip because of it's "supertackiness" which is great for fixing ribbon to things.
  • The third card was made from Chocolate Chip cardstock. A square piece of Very Vanilla was stamped using Chocolate Chip and then embossed using an embossing folder. It is important to stamp the images first and then emboss. I also put a piece of Very Vanilla card stock inside the card so that any message can be written on it.
  • The fourth card was made from Old Olive card stock. The medallion stamp from the Artistic Etchings set was stamped in Old Olive. A label from the Four Frames set was stamped in Chocolate Chip and then the message from the Just Believe set was stamped in Old Olive with the help of the Stamp-a-ma-jig. The label was attached using Stampin' Dimensionals.
The whole box was finished off with a piece of Very Vanilla 5/8" Satin Ribbon which was tied around the outside.

I hope you like this set of cards as I have a horrible suspicion that I will have few more of these boxes to make as gifts this year.