
In all we made, 6 cards and a mini scrapbook/album. If we had more time we would also have completed a card holder for the A6 sized cards but it was not to be.
The cards etc were originally designed by a group of us as there was 2 craft days held - one a week before ours.


Both of these were designed by me using the Fruits and Flowers stamp set which is in the Spring Mini Catalogue. All of the cards made on the day were made using Ink, Ribbon, Paper, Brads and Card Stock from the 2011-2013 In Color range.
The Get Well card has a Lucky Limeade base and also has Island Indigo DSP and card stock. The card stock was embossed using the Perfect Polka Dots embossing folder. The images were stamped onto Whisper White card stock before being punched out using the Scallop Square punch. The squares were mounted onto squares of Lucky Limeade that had been punched out using the Square punch. Once the card had been assembled some of the images were highlighted using Crystal Effects and then left to dry. This was the first card that everyone did so that the Crystal Effects had time to dry.
The Thinking of You card has a Pool Party base. A piece of Pool Party DSP was run through the Big Shot using the Embossing Frames folder and a piece of Whisper White that had been punched out and then distressed was stuck in the centre. Another piece of Whisper White was cut and punched using the Scallop Trim border punch. Once a tied piece of Lucky Limeade Ruffled Ribbon had been added to the Pool Party DSP the whole thing was added to the base card. A greeting from the Sincere Salutations stamp set was added too. I have to admit that my sample of this card was not looking this good by the end of the Craft Day as it had fallen onto an open ink pad. I'm just glad that I already had a photo of it otherwise I would be making another one.
The next set of cards were designed by Diane. She and Pip held their craft day the week before ours.

The card has a Calypso Coral card base and is know as a Single Swing Card. I had not made this type of card before, so making the sample for the Craft Day was interesting but it ended up not being too difficult. It's the usual story of having the right tools for the job. These being a Big Shot and a Top Note die that you don't mind drawing white lines on.
I love the colour combination of Calypso Coral and Pool Party (with a little bit of Lucky Limeade thrown in for good measure). The card also has some glitter in the form of some Dazzling Diamonds. All went will with the application of this until my mother decided it would be a good idea to blow the excess off her card. Needless to say it went everywhere and despite me using the vacuum cleaner a number of times I can still see it.

This card is a double swing card. Once I had figured out the single swing card it was much easier to figure out the double swing one as the basic principle is the same. This time I used the Clear Scallop Square Die and the Big Shot.
The card base is Island Indigo and we also used Lucky Limeade card stock and ink too along with some of the Designer Brads. The stamp used was the Sail Away single A La Carte stamp and on the reverse is a happy birthday greeting from the Happiest Birthday Wishes hostess set.


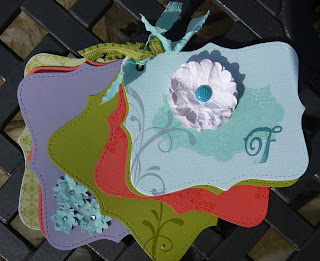
Last but not least everyone made a mini scrapbook/album using the Top Note Die. Everyone's were totally different and it was lovely to see just how different they were. I made mine using the Everything Eleanor, Broadsheet Alphabet stamp sets and the 2011-2013 In Colors. As you can see I also used the Scallop Circle and Boho Blossoms punches. I decorated six pages plus the front and back covers and the whole thing was put on a book ring to hold it together.
I don't think I'm going to have a chance to post any more Sale-a-Bration projects before the end of the month, so I will say that's all folks for Sale-a-Bration this year. Check back on Sunday to see what's in store for April and the remaining month of the Spring Mini.
I love the colour combination of Calypso Coral and Pool Party (with a little bit of Lucky Limeade thrown in for good measure). The card also has some glitter in the form of some Dazzling Diamonds. All went will with the application of this until my mother decided it would be a good idea to blow the excess off her card. Needless to say it went everywhere and despite me using the vacuum cleaner a number of times I can still see it.

This card is a double swing card. Once I had figured out the single swing card it was much easier to figure out the double swing one as the basic principle is the same. This time I used the Clear Scallop Square Die and the Big Shot.
The card base is Island Indigo and we also used Lucky Limeade card stock and ink too along with some of the Designer Brads. The stamp used was the Sail Away single A La Carte stamp and on the reverse is a happy birthday greeting from the Happiest Birthday Wishes hostess set.

The next card we made was a Never Ending Card. I made two samples, one with lots of the Everyday Enchantment paper from Sale-a-Bration and the other which had some paper but was mostly decorated with the Fresh Vintage stamp set. Both cards had a greeting from the Happiest Birthday Wishes hostess set. There are lots of instructions on the internet on how to make these cards but if you would like a copy of our instructions email me and I will send you a copy.

The last card that everyone made was this lovely Wisteria Wonder card made using the Flight of the Butterfly stamp set and matching Butterfly punch. The tags came from the Tiny Tags set and they were punched out using the Jewelry Tag punch and then fixed to the Pool Party Ruffled Ribbon with some Linen Thread.

Last but not least everyone made a mini scrapbook/album using the Top Note Die. Everyone's were totally different and it was lovely to see just how different they were. I made mine using the Everything Eleanor, Broadsheet Alphabet stamp sets and the 2011-2013 In Colors. As you can see I also used the Scallop Circle and Boho Blossoms punches. I decorated six pages plus the front and back covers and the whole thing was put on a book ring to hold it together.
I don't think I'm going to have a chance to post any more Sale-a-Bration projects before the end of the month, so I will say that's all folks for Sale-a-Bration this year. Check back on Sunday to see what's in store for April and the remaining month of the Spring Mini.


